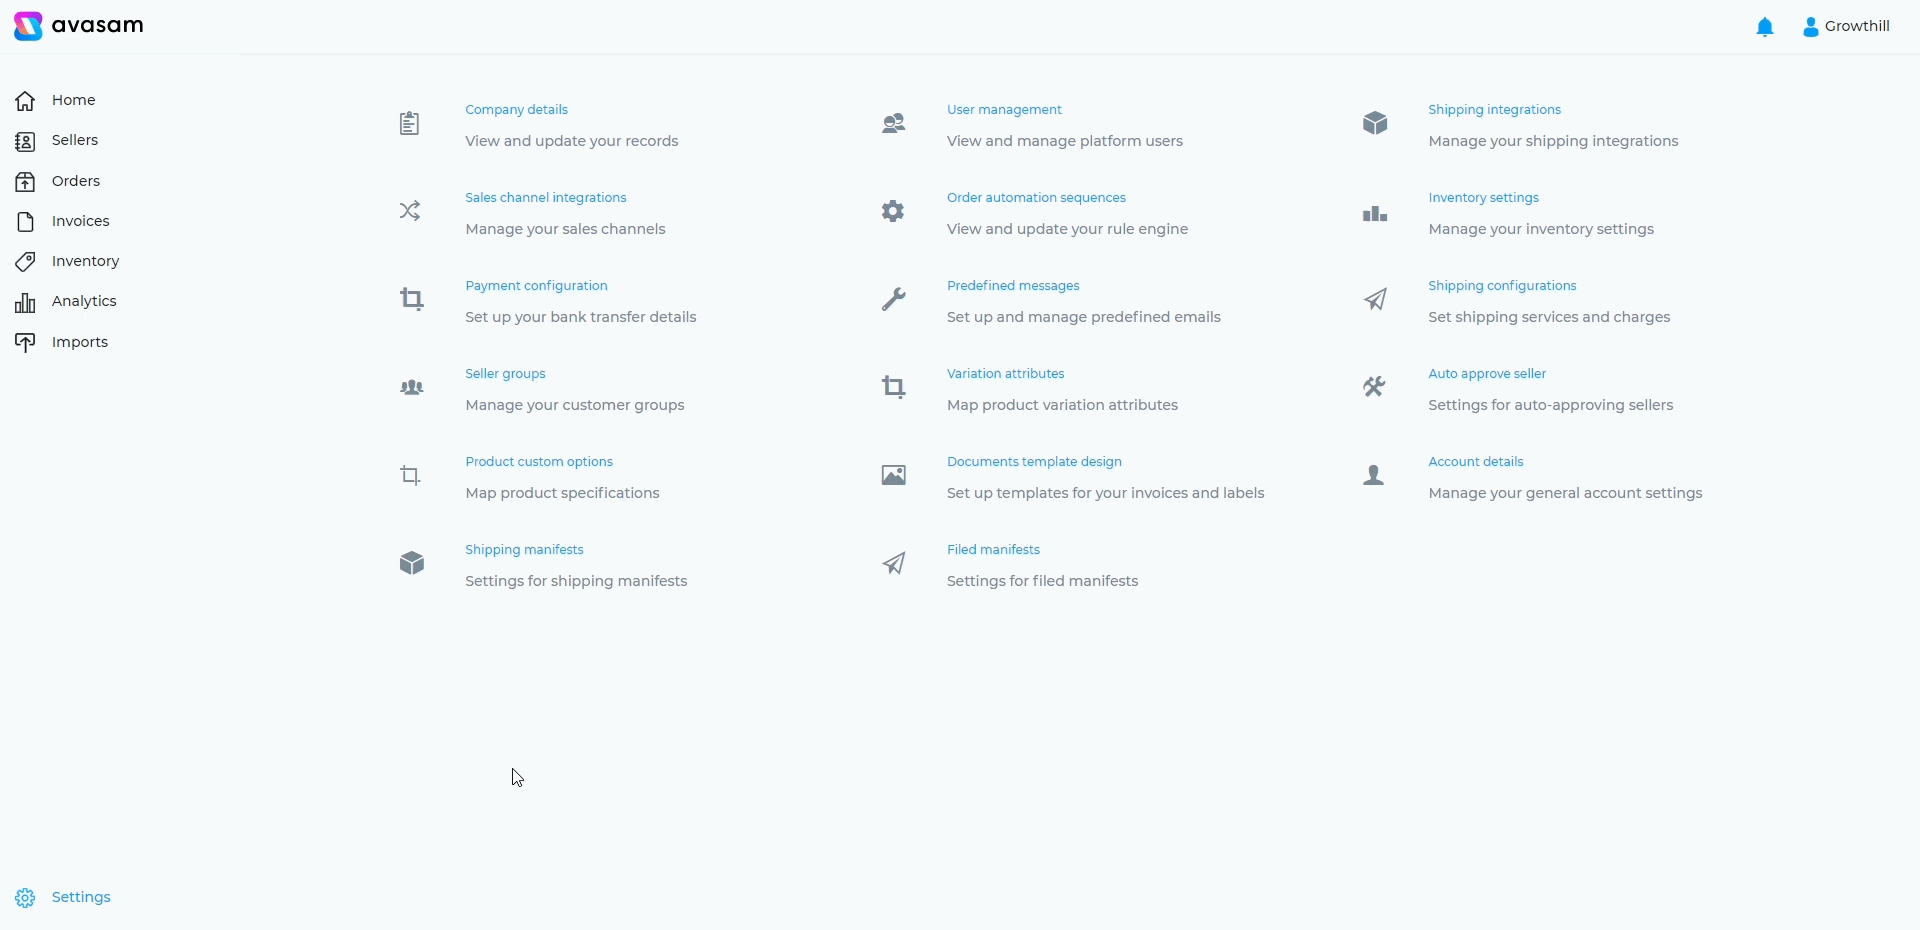
Settings
Integrating Shopify for suppliers
If your primary inventory source is your Shopify store, Avasam can use this as a source for your Avasam inventory
Please do not
The Shopify integration for suppliers is intended for use at the end of the onboarding process, when your account has been created. Please talk to your Supplier Manager about the stage in the process when you are able to integrate your Shopify store.
Integrating Shopify with Avasam
Your Avasam account can easily be linked to your Shopify store in order to draw on your inventory as you update it and synchronise orders.
- In Avasam, click on settings.
- Select channel integrations.

- Click add channel.

- Click the add button to the right of the Shopify entry.
- Enter your Shopify account name.
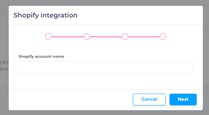
- Click next.
- Enter your Shopify site URL.

- Click next.
- You now need to enter 3 pieces of information from your Shopify store:
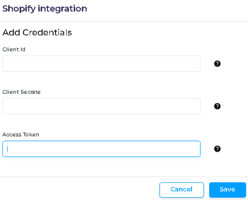
- Client ID.
- Client secret.
- Access token.
- To get this information, open a new tab and login to your Shopify store.
- Open the Apps tab.
- Click on the button to develop apps for your store.
- Click on the create an app button.
- Enter an app name, such as "AvasamApp" for later reference.
- Click create app.
- On the next screen, click on configure the Admin API scope.
- Enable (check) both of the options in each of the below sections:
- Assigned fulfillment orders
- Discounts
- Draft orders
- Fulfillment services
- Inventory
- Locations
- Order editing
- Orders
- Products
- Shipping
- Click save at the bottom of the list to apply the changes.
- Click on the API credentials tab.
- Click on install app.
- At this stage you will see the credentials needed for the integration. Copy and paste them into Avasam, as they will only be available and visible at this point. Changing the details or getting access to them will recquire you to create a new app (repeat the actions under this step).
- After entering the details into Avasam, click next.
- You will be asked to authorise the connection to your account on the Shopify website in a new tab. Please authorise it.
- Close the Shopify tab.
- The channel integrations screen will now show an entry for your Shopify website.
Please do not archive orders before they have been marked as dispatched in Avasam. Once archived, Avasam cannot get updates on the order, including status and tracking numbers.
Disable the option "Automatically archive the order" in Settings>Checkout.
Updating product prices and stock levels on listings automatically
After you have created your products in the inventory, update your prices and stock levels automatically to avoid problems
This help article is written for our suppliers and will not be relevant if you are an Avasam seller. To access seller-specific articles, please follow this link.
Updating products
If you need to update a product or products, and you're not using an integrated software solution such as Linnworks, we recommend that you use a product feed file for detailed changes or a s**tock and price feed** file for updating stock levels and prices.
When Avasam finds a file named Avasam Supplier Stock and Price Feed.csv in a specified FTP folder on our server, it will import it and then delete the file to confirm that it has been imported successfully. Contact our support team if you don't have access to this FTP folder.
Stock and price feed columns
| Column name | Description | Mandatory |
|---|---|---|
| ProductId | Internal identifier/SKU for product | Yes |
| StockQuantity | Current available stock level | Yes |
| PriceExclVAT | Net price to seller. Ex VAT | Yes |
| RRPExclVAT | Recommended Retail Price, ex VAT | No |
| VAT%Rate | VAT rate to apply to product as whole number (e.g. "20", "0") | Yes |
| ShippingCountry | 2 digit country code for the country you ship the product from (e.g. GB, US, ES) see ISO 3166 country codes https://www.iban.com/country-codes | No |
You can use quotes around the information in individual fields, but it's not compulsory.
For example:
"10.99" is the same as 10.99
"Sony" is the same as Sony
Repricing software
Please remember that, if using automatic repricing software on listings generated by or controlled by Avasam, they will override any rules or updates made within our sotware. As such, we cannot be held responsible if margins are not covered by the sale price in an order where this software is used, so ensure you check your products and the repricing software regularly.
For BigCommerce listings, you must ensure that your VAT/Tax settings are properly configured before listing products or sending price updates.
Suppliers: Restricting where your products can be sent
Some areas in the UK can incur additional shipping costs. You can exclude areas by postcode to avoid losses.
If you restrict or exclude areas from shipping, then the seller will be warned that orders to one of those postcodes for that product are not permitted.
Restricting orders to an area or postcode(s)
- Open settings
- Select company details.
- Click on the tax & shipping tab.
- Locate the excluded shipping locations dropdown list.
- Click on the list to expand it.
- You can search for location names or postcodes (full or partial).
- Tick any postcodes you will not ship to (you can select 1 or many).
- When you have selected all those you want to exclude, click away from the list to close it. The postcodes selected will be shown in the excluded shipping locations field.
- The updated exclusions will be applied, and shown against your products in the catalogue and inventory.
Orders for your products with an excluded postcode will not be invoiced or passed for fulfillment, including manual orders.
If international shipping enabled is set to yes, Avasam will invoice and take payment for non UK orders. By default it is set to no, and non-UK orders other than those using eBay's international programmes will not be invoiced and sent to you for dispatch.
Suppliers: Importing order information into Avasam
Save time and ensure consistency by importing order information from CSV files
This help article is written for our suppliers and may not be relevant if you are an Avasam seller. To access seller-specific articles, please follow this link.
Avasam can import order information from a CSV file. This is a text file, but can also be opened and edited in a spreadsheet such as Excel. To import a file, you must first tell Avasam what information you want to import. This file can either be uploaded from your PC manually, or Avasam can upload it on a regular basis from an FTP server.
Orders imported into Avasam from external sources aren't affected by our KPIs - the time to dispatch is up to you. You are also responsible for ensuring their are paid for, whether before dispatch or after.
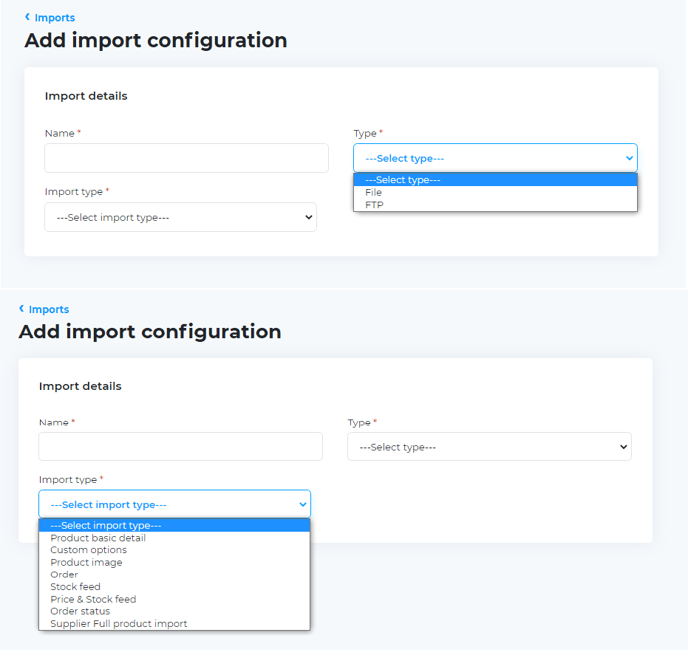
To create a new import configuration for a new import file type or source, you will need an example file to use:
- In Avasam, open the settings menu.
- Select imports.
- Click on the add configuration button.
- Enter a name for the import configuration that will help you see the purpose later.
- In the add import configuration pop-up, select either file or FTP from the drop-down list labelled type.
- File means you have the CSV file on your local PC.
- FTP allows Avasam to access the CSV file from a specific remote/web file server. You will be provided with access details by the Avasam team to manually or automatically add your files into this location.
- In the import type list, select order.
- Click on the link marked download CSV template to review the fields to be used or to populate a copy of the file.
- When you have a CSV file ready to import, click on the upload button and locate the file in the browser window before clicking open.
- Click the analyse and map button to review the data in the file for errors.
- A data preview will be loaded. If this shows the data in the file correctly, then move to the field mapping section below it.
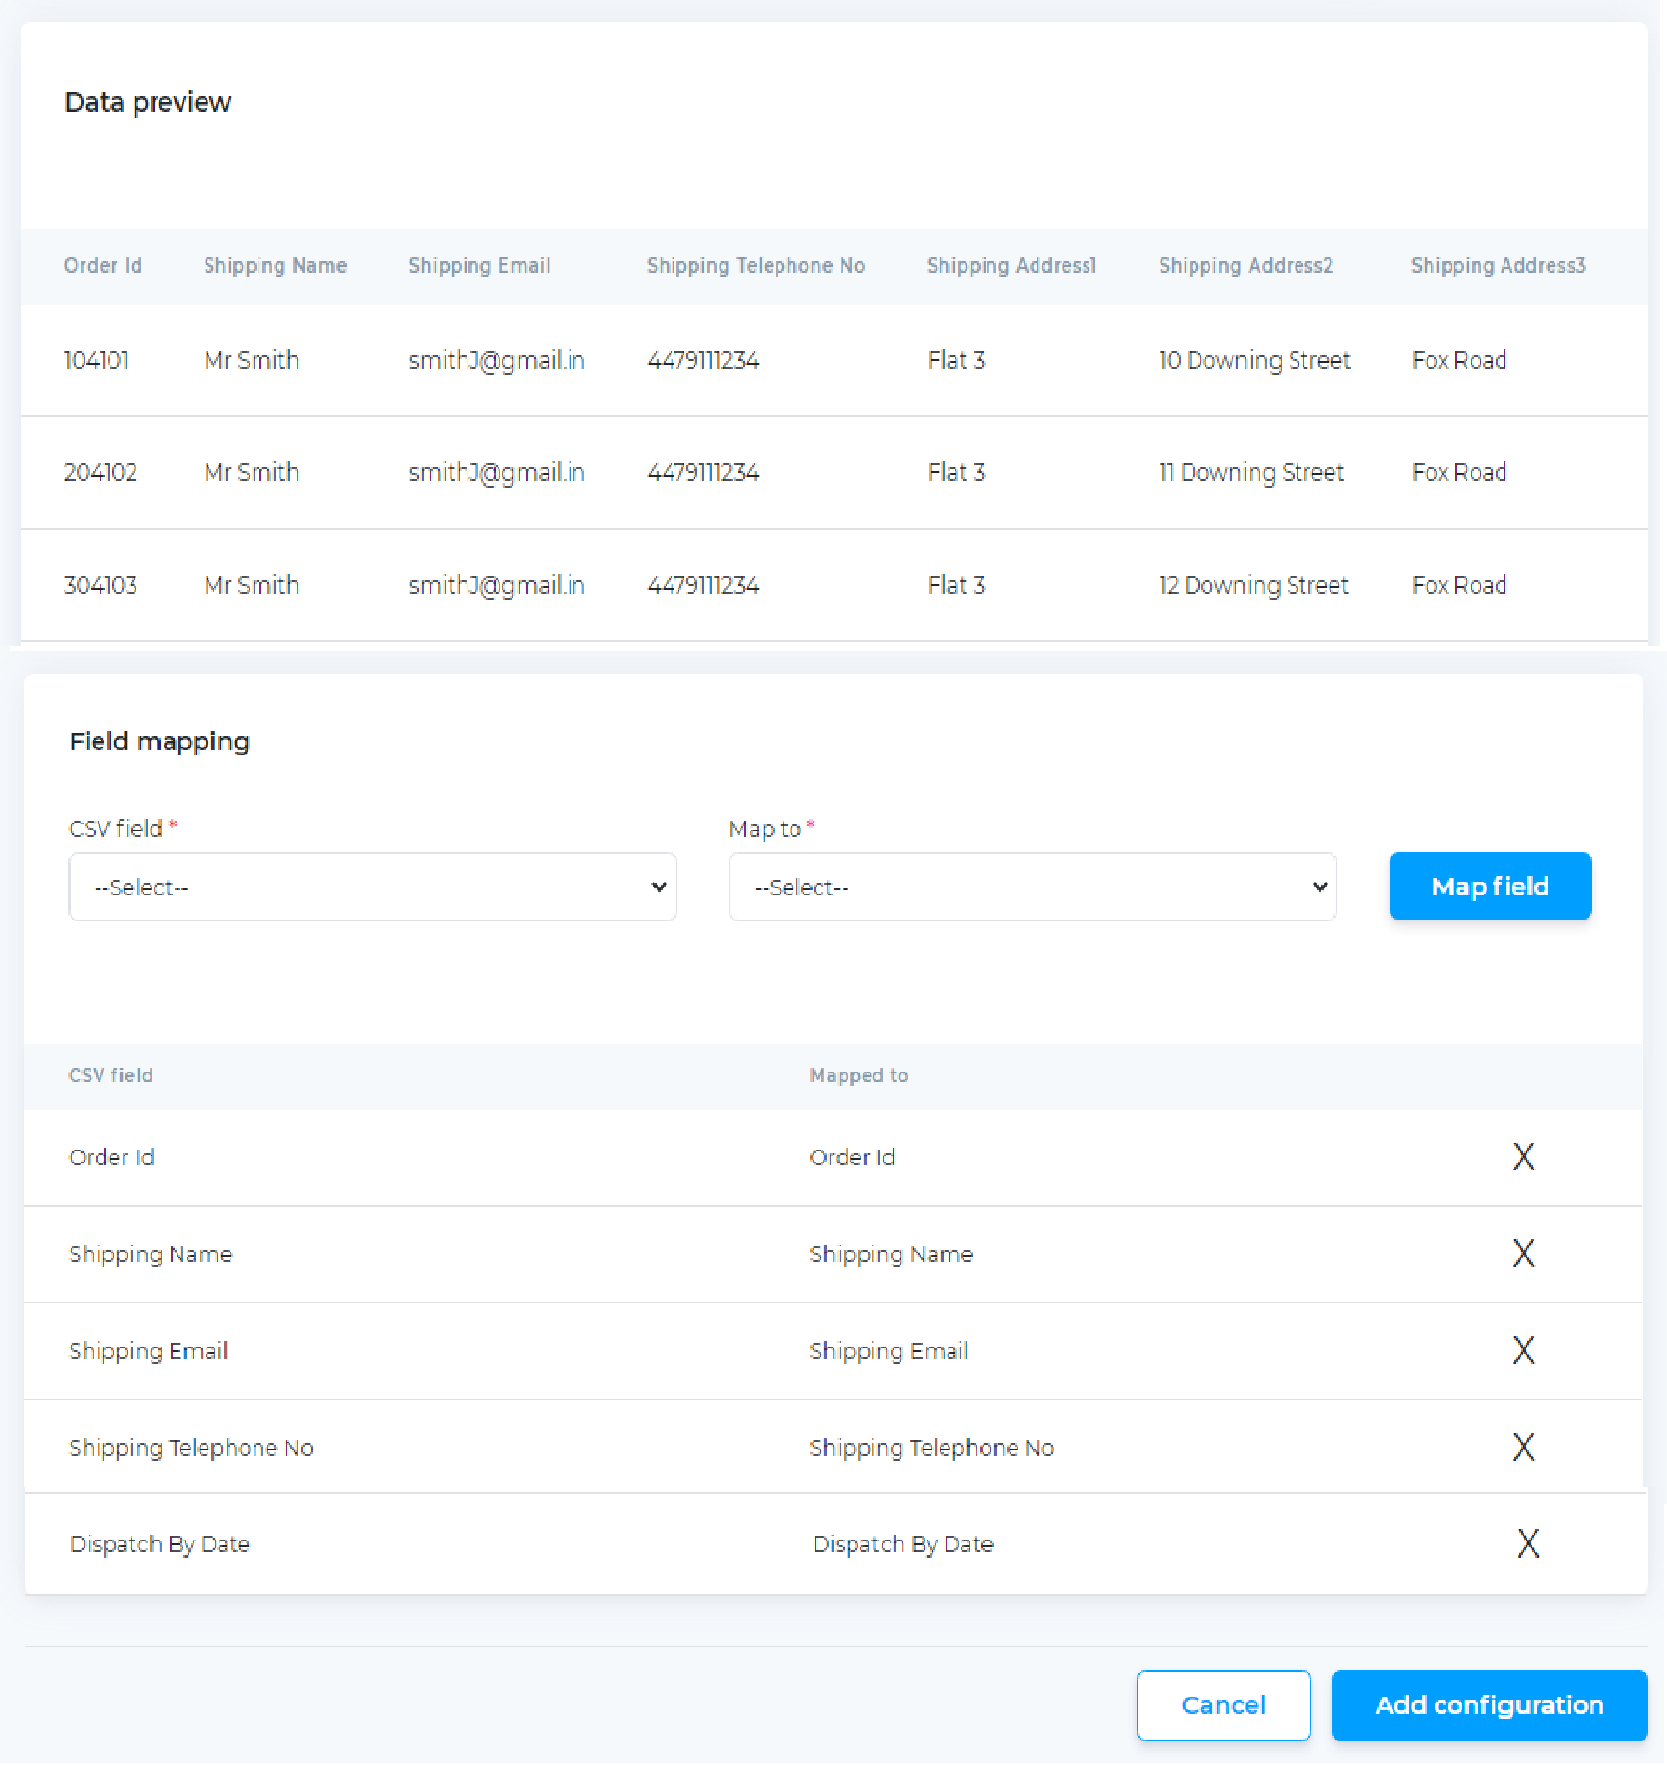
- The left-hand column lists the column headings in the file you uploaded and the right-hand column shows which Avasam field they have been matched to. Avasam will automatically match fields if their name matches the name of the field exactly.
- To create a mapping:
- Select the name of the CSV heading in the CSV field drop-down.
- Select the Avasam field you want to map it to in the map to drop-down list.
- Click 'map field' to create the mapping.
- Both fields will be removed from the drop-downs and the list will be updated.
- If you want to remove a mapping:
- Locate the relevant line in the list of fields.
- Click on the 'x' to the right then confirm that you want to delete the mapping.
- Both fields will become available in the relevant drop-down lists.
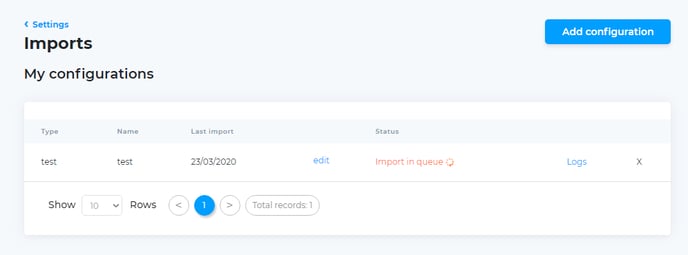
- When you are satisfied that all fields have been mapped, click on the add configuration button before being returned to the 'imports' screen. It will now show your newly-added import configuration.
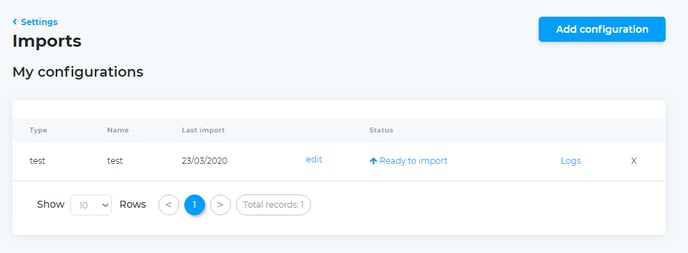
Once a configuration has been created and used once, it can be reused multiple times.
- In Avasam, open the settings menu.
- Select 'imports'.
- Locate the import configuration you want to use. It should show the status as 'ready to import'.
- Click on 'ready to import', then locate the relevant file to import and click on 'open'. The import's status will then be changed to 'import in queue'.
- While the file is being imported, you can check its progress by looking at the logs. To do this, click on the logs link.
- A list will then be shown that gives you the dates and times the import has been run. Click on 'view' to open the selected import log.
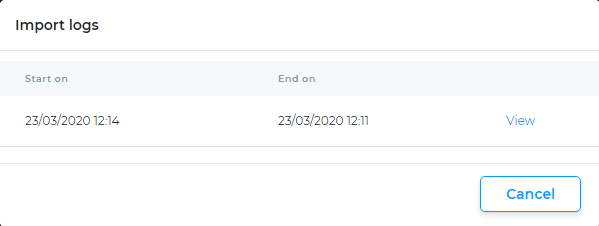
- When you have finished reviewing the logs, click 'cancel' to return to the list, then 'cancel' again to return to the main import configurations screen.
Orders outside of the UK will not be invoiced or fulfilled in Avasam unless you enable the option . In addition, you can choose to not offer shipping to specific areas by postcode. More information on changing these options can be found here.
Suppliers: Updating shipping configurations
Make sure that your shipping prices and services are consistent and reflect Avasam guidelines using this guide
This help article is written for our suppliers and may not be relevant if you are an Avasam seller. To access seller-specific articles, please follow this link.
Sellers need to know the cost of the different shipping services you offer, so they can charge their customers correctly. Likewise, Avasam needs to know the cost so it can accurately invoice them.
In this section, you can define the base cost and tax rate for the specified shipping services you are offering to the seller.
Pricing can be fixed, or you can setup order value, or weight based costs for the services. These will then be shown by Avasam in the catalogue and inventory.
It is important that your shipping prices are in line with the range guidelines set by Avasam, which at present are:
- Standard shipping (3-5 days): below £3.00, excluding VAT
- Standard Tracked shipping (2-3 days): below £4.50, excluding VAT
- Expedited shipping (1-2 days): below £7.00, excluding VAT
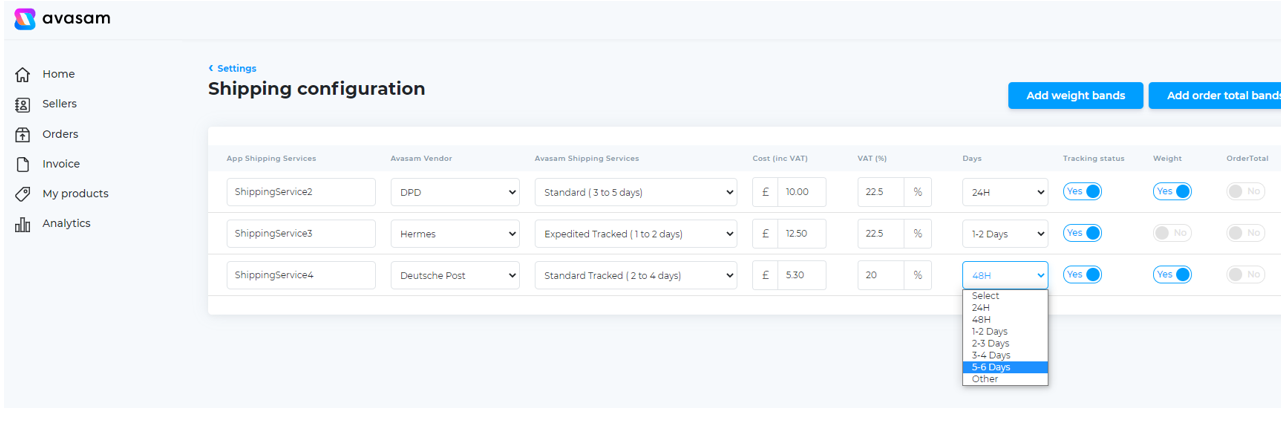
You can also map the services to different number of days if you have longer shipping times e.g. 5-6 days. This can be seen in the screenshot below:
You must setup at least 1 shipping service, otherwise sellers will not be able to use the automated price rules correctly.
We would strongly recommend offering all 3 services to give the most choice to the sellers and their customers.
The primary fields required when setting the services up are shown in the list below:
| Field | Description |
|---|---|
| Shipping Services | This is the name of the service |
| Cost | This is the basic cost (in your specified currency) for an order using this shipping service |
| Tax(%) | This specifies the sales tax rate that is added onto the cost of the service when it is invoiced |
| Status | This specifies if the service is active for use |
Shipping services can have a single fixed price, or they can be enabled for pricing based on order weight or order value.
You cannot enable order weight and order value shipping pricing at the same time, you must choose one or the other.
Either can be used in combination with fixed pricing.
Adding a fixed-priced service
To add new services and specify a fixed cost, follow these steps:
- Click on settings.
- Click on shipping configurations.
- Click the add service button for a new entry to appear on the list.
- Enter a name for the service.
- Select the Avasam vendor from the list to show which shipping company is providing this service:
- Royal Mail
- Hermes
- DPD
- UK Mail
- Deutsche Post
- Any (If your shipping provider is not in the list)
- Specify the base cost and VAT rate for the cost of the shipping service.
- Change the service status to ‘yes’ by clicking on it.
- Click ‘save’ to complete the entry.
You must have weight correctly specified on your products when using weight-based pricing, as this may lead to undercharging for shipping if weight is 0 or too low.
Setting up weight-based shipping
Weight-based shipping uses 'bands' to define pricing. Items/orders within a given weight range are charged based on the Avasam shipping service used.
- Click on add weight bands.
- The window opens with one weight band available.
- Enter the minimum (weight from) and maximum (weight to) values for this band, in kilograms.
- For the Avasam shipping services you will be using weight-based shipping, enter the cost to ship an item with each service where their weight falls within this band.
- If you want to add additional bands, click add weight band, and repeat steps 3&4.
- Click save when you have finished.
A service band specifies the shipping cost for an item that falls within a given weight range.
If the service band between 0kg and 1kg costs £2.00 to ship, then a smaller package weighing 0.5kg would cost £2.00. A larger package weighing 1.2kg would fall within another service band.
The maximum and minimum values for each band should be different to each other.
eg. if one weigh band is up to 2.0 kg, then the next weight band should be from 2.01 kg.
Adding an order total-based service
Order total-based shipping uses 'bands' to define pricing. Items/orders within a given value range are charged based on the Avasam shipping service used.
- Click on add order total bands.
- The window opens with one weight band available.
- Enter the minimum (order total from) and maximum (order total to) values for this band.
- For the Avasam shipping services you will be using order total-based shipping, enter the cost to ship an item with each service where their weight falls within this band.
- If you want to add additional bands, click add order total band, and repeat steps 3&4.
- Click save when you have finished.
A service band specifies the shipping cost for an order that falls within a given value range.
If the service band between £0.00 and £20.00 costs £2.00 to ship, then a smaller order valued at £5.00 would cost £2.00. A larger package valued at £35.00 would fall within another service band.
The maximum and minimum values for each band should be different to each other.
eg. if one weigh band is up to £2.00, then the next weight band should be from £2.01.
You can undo the changes you make at any time by clicking on the cancel button.
Deleting a service band
- Click on settings.
- Click on shipping configurations.
- Click the add order total bands or add weight-based total bands button for the window to open.
- Locate the entry you want to remove.
- Click on the X button to the right of the band to delete the row.
- Click save to apply the changes.
Updating company details
Avasam can store details about your company for use into help you work more effectively, such as in automatic responses to sellers, among other things
Avasam is designed to automate many of the more repetitive and tedious tasks involved in DropShipping and working with sellers and customers. As such, we recognise that one company may have multiple addresses – a registered address, a trading address, separate returns handling and so on.
Avasam can store these, so that they can more easily be provided to sellers as appropriate,.
It is essential to ensure that your returns address is correct and up to date, as it will be provided to sellers automatically as part of the automated returns process.
Accessing and updating information about your company
- Locate the Company details option in Settings, and click to open.
- Locate the information to enter or update.
- Update the information.
- Click Save to apply the change.
Avasam stores information including:
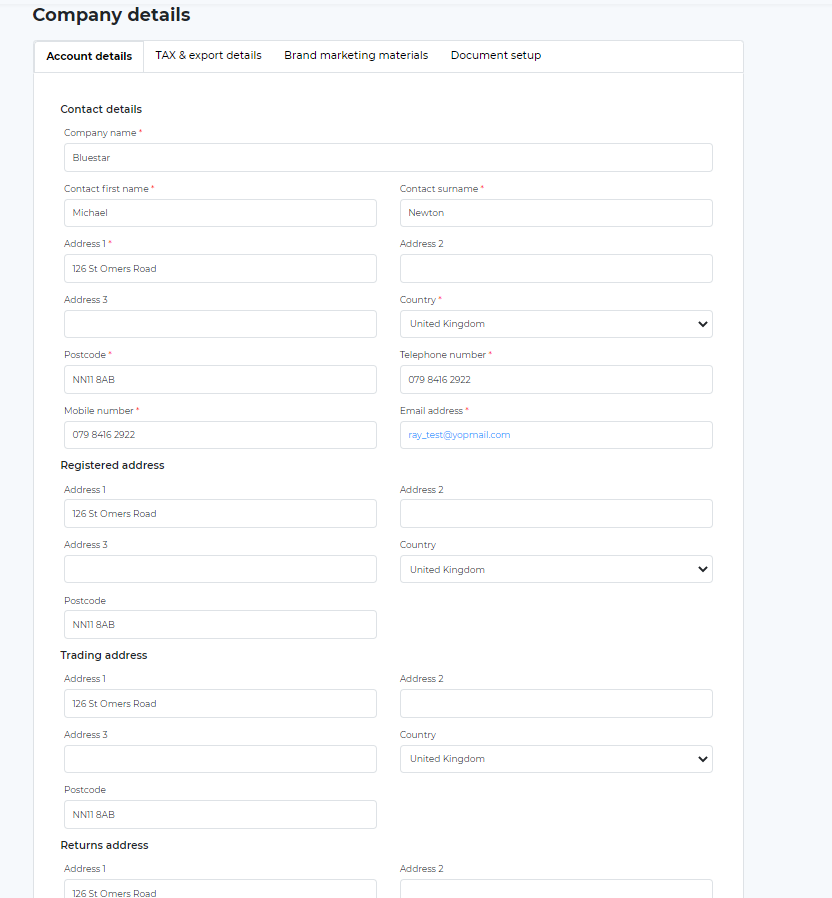
Contact details
Company name
Contact first name
Contact surname
Telephone number
Mobile number
Email address
Registered address
Trading address
Returns address
Company details
The company details page will appear as below:
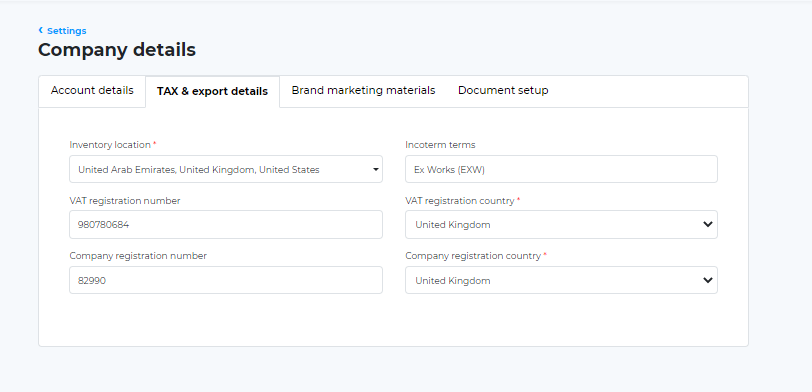
In addition, there are new sections related to TAX and exports, Brand marketing materials and Document setup.
In the TAX & export details section you will be required to add your inventory location, VAT registration number/country (If applicable) & Company registration number/country (If applicable)
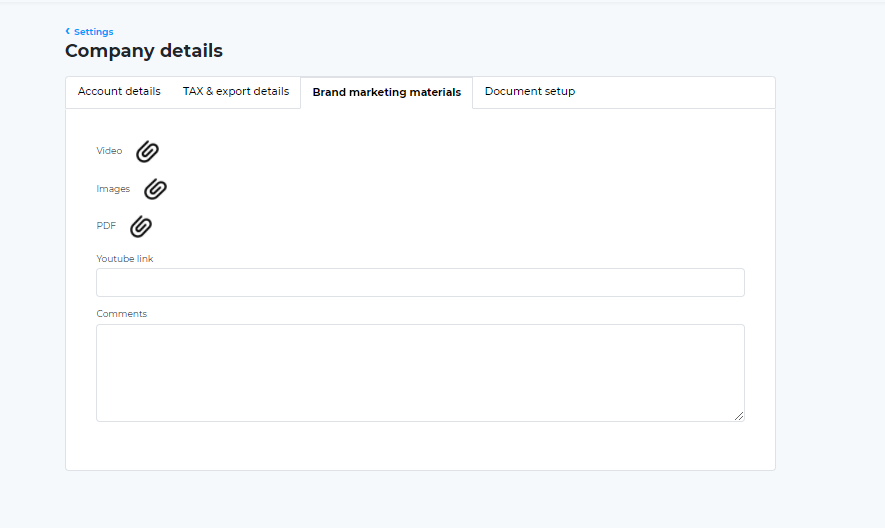
In the brand marketing materials section you have the option to add any marketing videos, images, and PDF files that you wish. share with sellers for promotional activities. This will help your products get more attention.
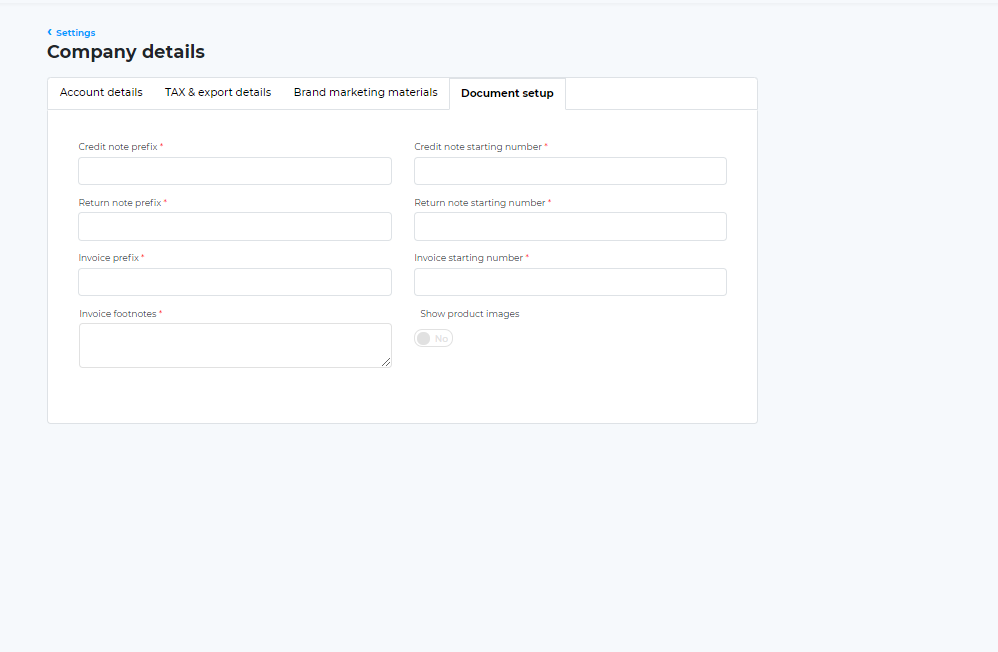
In the Document setup section you will be required to enter credit note, returns and invoice details, so that the payments process flows smoothly as order transactions begin on the platform.
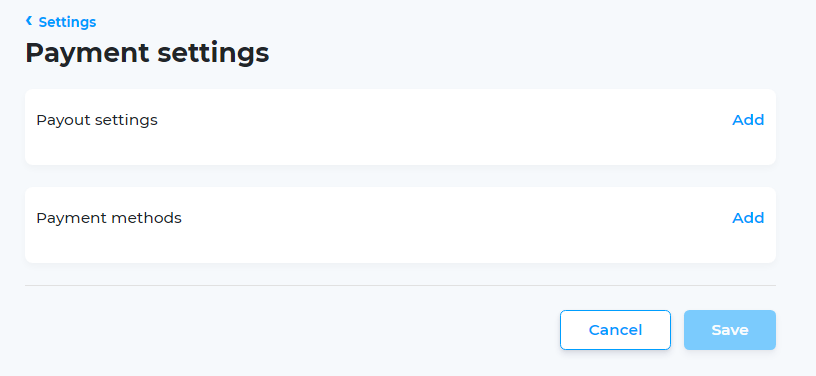
Suppliers: Configuring payment settings in Avasam
Make sure your bank account details are right to make sure you're receiving payments correctly
This help article is written for our suppliers and may not be relevant if you are an Avasam seller. To access seller-specific articles, please follow this link.
Payment settings
This section allows you to specify the details of the bank account into which you wish to receive money from Avasam after sellers have paid their invoices.
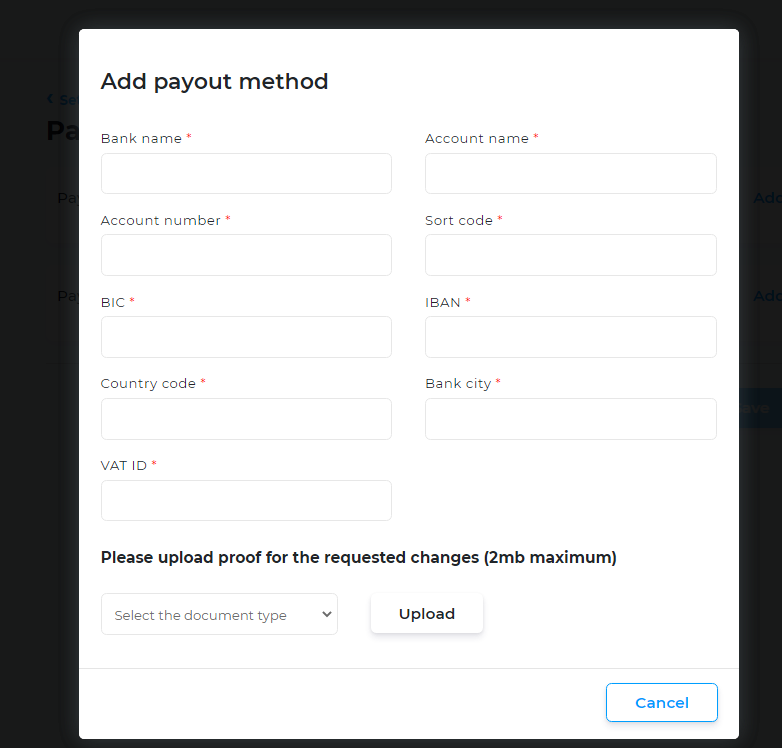
| Field | Description |
|---|---|
| Bank Name | The name of the Bank. |
| BIC | The Bank Identification Code. |
| Country code | The Country Code. |
| IBAN | The International Bank Account Number. |
| Owner Name | The name of the account holder. |
| Bank City | The city the bank is located in. |
| Tax ID | Your tax registration/ID number. |
Once you have input your details, click ‘save’ to apply them.
- Fields marked with an asterisk (*) are compulsory and must be completed.
Changes and updates
If you make any changes to the settings, Avasam will display the term ‘unsaved changes’ at the bottom left corner of the screen.
- You can return to the main page at any time by clicking on the ‘settings’ link in the top-left, or the cancel button.
- To save the changes you have made and apply them, click on ‘save’.
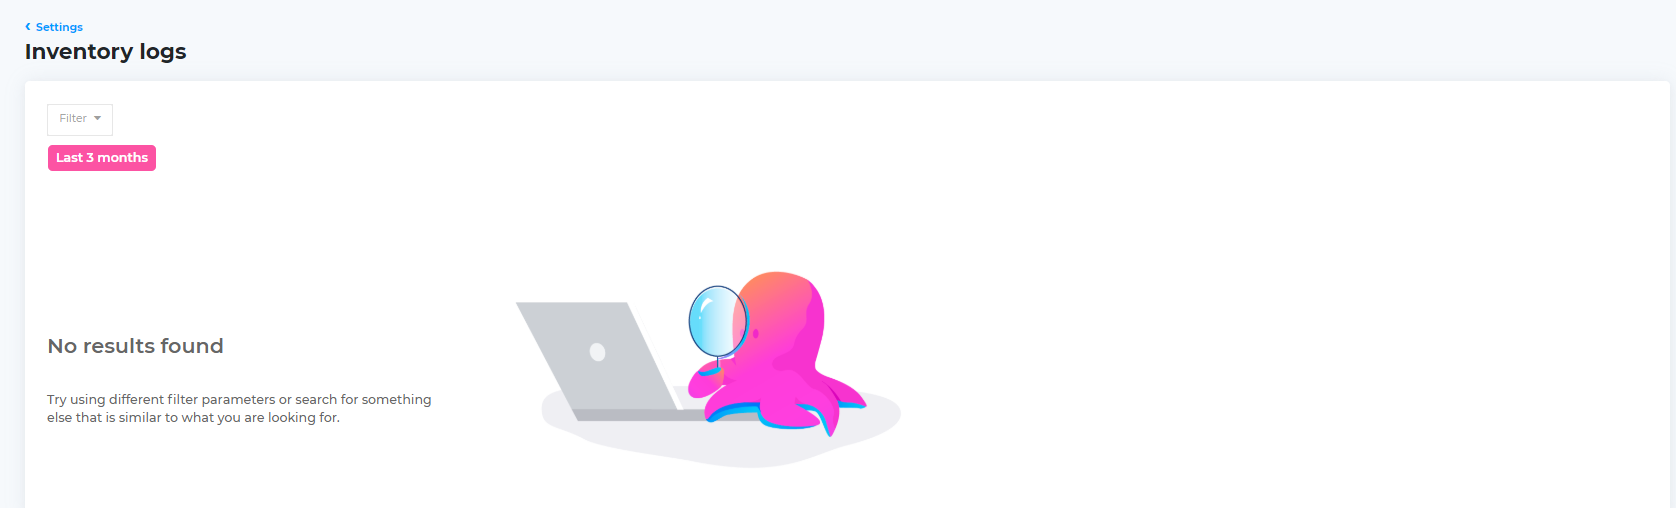
Suppliers: Reviewing inventory logs
Keep track of changes that affect your inventory and track your stock efficiently
This help article is written for our suppliers and may not be relevant if you are an Avasam seller. To access seller-specific articles, please follow this link.
When actions are taken that affect your inventory, these are recorded by Avasam,
When you first start using Avasam, or if you have filtered out all the available records, you will see the following screen:
Once the filter has been adjusted, or actions have been taken in the system, the view will update:
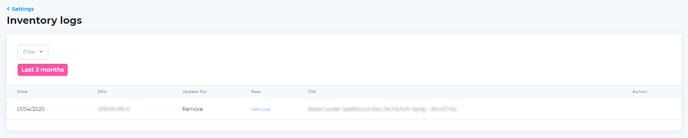
The fields in the log are as follows:
| Field | Description |
|---|---|
| Date | Date the change occurred |
| SKU | Stock item affected |
| Update for | Action taken |
| New | New value |
| Old | Original value |
| Action | Value of action taken to change |
Filtering the report
To make changes to the information displayed, use the 'filter' options:
- Enter the seller’s details (business, contact name, email or postcode) in the search box or select a time period to filter the results shown.
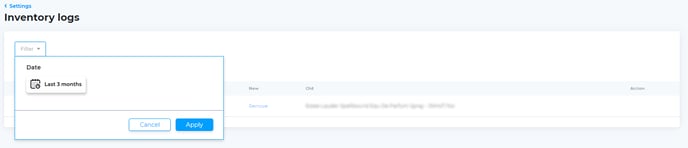
- Click ‘Apply’.
Suppliers: Shipping integration - myHermes
In order to create myHermes labels in Avasam, the shipping service must be integrated and services added
This help article is written for our suppliers and may not be relevant if you are an Avasam seller. To access seller-specific articles, please follow this link.
Avasam can be integrated with one or more myHermes shipping accounts to print shipping labels for orders when they are dispatched.
The list of shipping integrations has four columns:
- The logo representing the type of shipping provider
- The type of shipping integration
- The name of the specific shipping integration
- The status of the integration
Creating a new integration
- In ‘settings’, select ‘shipping integrations’.
- Click the add shipping provider button.
- Click on the add button next to ‘myHermes’ and enter a name for this integration.
- Click ‘next’ to continue.
- The next entry is the configuration screen, where you should input your myHermes account details.
- Your API key will be specified in your account and documentation.
- In ‘weight’, choose a measurement unit for your inventory items, so that myHermes can correctly check the service you use (e.g. grams, kilograms, ounces or pounds).
- If you don’t specify the weight of any inventory items, enter a default weight value that Avasam will send to myHermes when requesting a label.
- In ‘dimensions’, choose a measurement unit for the size (weight, height and depth) of your inventory items, so that myHermes can correctly check the service you use (e.g. centimetres, metres, inches or feet).
- Enter values to be sent as the height, width and depth of a package if you haven’t specified it in the inventory items.
- Specify the label format used to request and print your shipping labels then click ‘next’.
- Avasam can automatically submit manifests for your parcels at the end of each day. If you wish to submit manifests manually, then check ‘no’ against ‘automatically submit manifest' then click ‘next’.
- You will be returned to the shipping provider list in Avasam, with a new row added for your new integration.
- Click ‘cancel’ to return to the list without completing the integration.
- If you are using Avasam with Linnworks, ensure you use the same units in Avasam and Linnworks for ‘weight’ and ‘dimensions’.
Disabling a shipping integration
When you create a new shipping integration, it is automatically enabled and active.
To disable the integration to stop it being available for use:
- In ‘settings’, select ‘shipping integration’.
- Find the shipping provider you want to disable.
- Click the status switch to toggle it from yes/active to no/disabled.
- The integration will then be disabled.
Enabling a shipping integration
When you create a new channel integration, it is automatically enabled and active. You, or someone else, may temporarily disable it.
To re-enable the integration to resume downloading orders and updating listings:
- In ‘settings’, select ‘shipping integration’.
- Find the shipping provider you want to enable.
- Click the status switch to toggle it from no/disabled to yes/active.
- The integration will then be re-enabled.
Removing a channel integration
If you no longer wish to have Avasam print shipping labels for a provider, it can be easily removed. Once deleted, you will need to recreate the integration from scratch should you choose to reuse it.
To remove a channel integration:
- In ‘settings’, select ‘shipping integration’.
- Find the shipping provider you want to remove.
- To open the integration, click its name.
- Click the red remove account button to remove the integration.
- Click ‘OK’. You will then be returned to the list of shipping providers.
- Click ‘cancel’ if you decide to not delete the integration.
Updating a channel integration
If Avasam is having issues printing labels correctly, you can easily check integration details:
- In ‘settings’, select ‘shipping integration’.
- Find the shipping integration you want to check.
- To open the integration, click its name.
- Click ‘reauthorize’ and check that the values are correct.
- Click ‘save’ to apply any updates or changes.
- You will be then returned to the list of shipping integrations.
- Click ‘cancel’ if you decide to not change or update the integration.
Shipping services
After integrating myHermes with Avasam, you must also add the shipping services you wish to print labels for – for example, next day, two day, signed for or Saturday delivery. When you sign an agreement with myHermes, you select the services you want to use and how much each label will cost.
To add a shipping service:
- In ‘settings’, select ‘shipping integration’.
- Find the shipping integration you want to check and open it by clicking its name.
- Click ‘shipping services’ to expand the list of available shipping services.
- Select an available shipping service from the shipping service list then click ‘add’.
- Click ‘save’.
- Click ‘cancel’ if you decide not to add the service
Deleting a shipping service
If you no longer want to use a shipping service, then it can be removed from Avasam.
To delete a shipping service:
- In ‘settings’, select ‘shipping integration’.
- Find the shipping integration you want to check and open it by clicking its name.
- Click ‘shipping services’ to expand the list of available shipping services.
- Select an available shipping service from the shipping service list and click the ‘x’ to the right of the service to delete it.
- Click ‘save’.
- Click ‘cancel’ if you decide not to delete the service.
Suppliers: Shipping integration - Parcelwise
In order to create myHermes labels in Avasam, the shipping provider must be integrated and services added
This help article is written for our suppliers and may not be relevant if you are an Avasam seller. To access seller-specific articles, please follow this link.
Avasam can be integrated with one or more Parcelwise shipping accounts to print shipping labels for orders when they are dispatched.
The list of shipping integrations has four columns:
- The logo representing the type of shipping provider
- The type of shipping integration
- The name of the specific shipping integration
- The status of the integration
Creating a new integration
- In ‘settings’, select ‘shipping integrations’.
- Click the add shipping provider button.
- Click on the add button next to ‘Parcelwise’ and enter a name for this integration.
- Click ‘next’ to continue.
- The next component to edit is the ‘configuration screen’ and the address entered will be shown on your shipping labels.
- Enter your business name in the company name field.
- Enter your name, or the name of the external contact for your account, in the contact name field.
- Enter your returns address in the address line one field.
- If required, enter the next line of your site address in the address line two field.
- Enter your county or district in the region field.
- Enter your town in the city/town field.
- Enter your postcode in the postcode field.
- Enter the email address for returns in the contact email field.
- Enter the telephone number for returns in the contact telephone field.
- Click ‘next’.
- You should input your Parcelwise account details on the next configuration screen.
- Your API key and customer account number will be specified in your account and documentation.
- In ‘weight’, choose a measurement unit for your inventory items, so that Parcelwise can correctly check the service you use (e.g. grams, kilograms, ounces or pounds).
- If you don’t specify the weight of any inventory items, enter a default weight value that Avasam will send to Parcelwise when requesting a label.
- In ‘dimensions’, choose a measurement unit for the size (weight, height and depth) of your inventory items, so that Parcelwise can correctly check the service you use (e.g. centimetres, metres, inches or feet).
- Enter values to be sent as the height, width and depth of a package if you haven’t specified it in the inventory items.
- Click ‘next’.
- Specify the label format used to request and print your shipping labels then click ‘next’.
- Avasam can automatically submit manifests for your parcels at the end of each day. If you wish to submit manifests manually, then check ‘no’ against ‘automatically submit manifest' then click ‘next’.
- You will be returned to the shipping provider list in Avasam, with a new row added for your new integration.
- Click ‘cancel’ to return to the list without completing the integration.
- If you are using Avasam with Linnworks, ensure you use the same units in Avasam and Linnworks for ‘weight’ and ‘dimensions’.
Disabling a shipping integration
When you create a new shipping integration, it is automatically enabled and active.
To disable the integration to stop it being available for use:
- In ‘settings’, select ‘shipping integration’.
- Find the shipping provider you want to disable.
- Click the status switch to toggle it from yes/active to no/disabled.
- The integration will then be disabled.
Enabling a shipping integration
When you create a new channel integration, it is automatically enabled and active. You, or someone else, may temporarily disable it.
To re-enable the integration to resume downloading orders and updating listings:
- In ‘settings’, select ‘shipping integration’.
- Find the shipping provider you want to enable.
- Click the status switch to toggle it from no/disabled to yes/active.
- The integration will then be re-enabled.
Removing a channel integration
If you no longer wish to have Avasam print shipping labels for a provider, it can be easily removed. Once deleted, you will need to recreate the integration from scratch should you choose to reuse it.
To remove a channel integration:
- In ‘settings’, select ‘shipping integration’.
- Find the shipping provider you want to remove.
- To open the integration, click its name.
- Click the red remove account button to remove the integration.
- Click ‘OK’. You will then be returned to the list of shipping providers.
- Click ‘cancel’ if you decide to not delete the integration.
Updating a channel integration
If Avasam is having issues printing labels correctly, you can easily check integration details:
- In ‘settings’, select ‘shipping integration’.
- Find the shipping integration you want to check.
- To open the integration, click its name.
- Click ‘reauthorize’ and check that the values are correct.
- Click ‘save’ to apply any updates or changes.
- You will be then returned to the list of shipping integrations.
- Click ‘cancel’ if you decide to not change or update the integration.
Shipping services
After integrating Parcelwise with Avasam, you must also add the shipping services you wish to print labels for – for example, next day, two day, signed for or Saturday delivery. When you sign an agreement with Parcelwise, you select the services you want to use and how much each label will cost.
To add a shipping service:
- In ‘settings’, select ‘shipping integration’.
- Find the shipping integration you want to check and open it by clicking its name.
- Click ‘shipping services’ to expand the list of available shipping services.
- Select an available shipping service from the shipping service list then click ‘add’.
- Click ‘save’.
- Click ‘cancel’ if you decide not to add the service
Deleting a shipping service
If you no longer want to use a shipping service, then it can be removed from Avasam.
To delete a shipping service:
- In ‘settings’, select ‘shipping integration’.
- Find the shipping integration you want to check and open it by clicking its name.
- Click ‘shipping services’ to expand the list of available shipping services.
- Select an available shipping service from the shipping service list and click the ‘x’ to the right of the service to delete it.
- Click ‘save’.
- Click ‘cancel’ if you decide not to delete the service.
Suppliers: Reviewing your shipping manifests
Keep track of your shipped orders on a daily basis by using Avasam's shipping manifests feature
This help article is written for our suppliers and may not be relevant if you are an Avasam seller. To access seller-specific articles, please follow this link.
Shipping manifests detail when individual shipping providers are used on a daily basis. This allows you to review usage and to know which pickups are due and when.
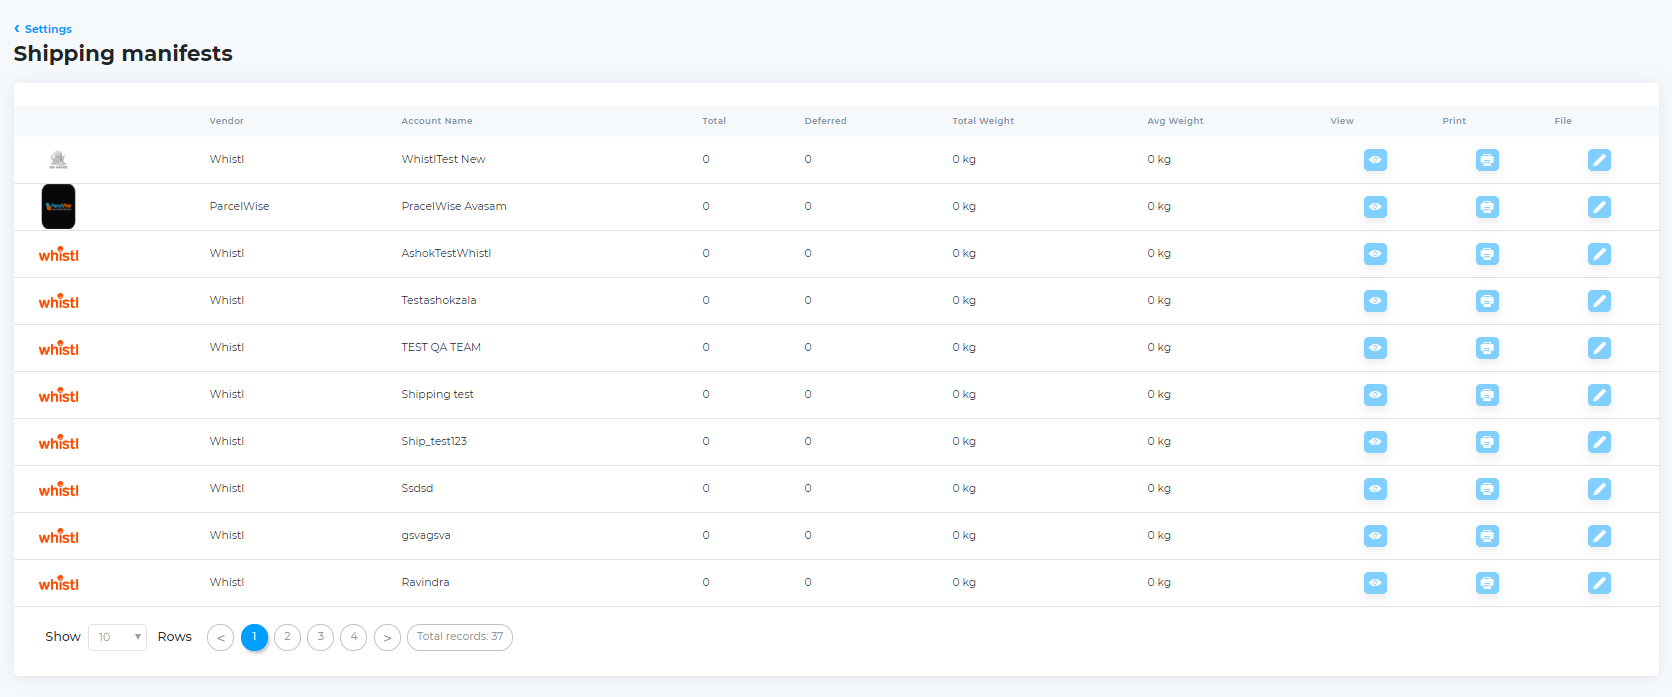
Filed manifests
When you complete the dispatch for the day, the manifests are filed. The filed manifests screen gives you an overview of each shipping provider per day, allowing you to see all shipments and consider which providers are giving you the best deal.
Suppliers: Whistl shipping integration
In order to create Whistl labels in Avasam, the shipping provider must be integrated and services added
This help article is written for our suppliers and may not be relevant if you are an Avasam seller. To access seller-specific articles, please follow this link.
Avasam can be integrated with one or more Whistl shipping accounts to print shipping labels for orders when they are dispatched.
The list of shipping integrations has 4 columns:
- The logo for each shipping provider.
- The type of shipping integration.
- The name of the specific shipping integration.
- The status of the integration (yes/blue is enabled, no/grey is disabled).
Adding a new integration
- In ‘settings’, select ‘shipping integrations’.
- Click the add shipping provider button.
- Click on the add button next to the Whistl description.
- Enter the name for this integration then click ‘next’ to continue.
- This will bring up the configuration screen. The address in this screen will be shown on your shipping labels.
- Fill in all relevant details then click ‘next’.
- This will bring up another configuration screen where you should enter all relevant details from your Whistl account.
- Click ‘next’ to continue and bring up a third configuration screen where you should add measurement details for your packages.
- If you don’t specify the weight of any inventory items, enter a weight value that Avasam will send to Whistl when requesting a label in the default weight field.
- Click ‘next’.
- Avasam can automatically submit manifests for your parcels at the end of each day. If you wish to submit manifests manually, then check ‘no’ against ‘automatically submit manifest’.
- Click ‘next’. You will then be returned to the shipping provider list in Avasam, with a new row added for your new integration.
- Click ‘cancel’ to return to the list without completing the integration.
- If you are using Avasam with Linnworks, ensure you use the same units in Avasam and Linnworks for ‘weight’ and ‘dimensions’.
Disable shipping integration
When you create a new shipping integration, it is automatically enabled and active.
To disable the integration to stop it being available for use:
- In ‘settings’, select ‘shipping integration’.
- Find the shipping provider you wish to disable.
- Click the status switch to toggle it from yes/active to no/disabled.
Enable shipping integration
When you create a new channel integration, it is automatically enabled and active. A user with access permissions may temporarily disable it.
To re-enable the integration to resume downloading orders and updating listings:
- In ‘settings’, select ‘shipping integration’.
- Find the shipping provider you wish to enable.
- Click the status switch to toggle it from no/disabled to yes/active.
Remove channel integration
If you no longer wish to have Avasam print shipping labels for a provider, it can be easily removed. Once deleted, you will need to recreate the integration from scratch should you choose to re-use it.
To remove a channel integration:
- In ‘settings’, select ‘shipping integration’.
- Find the shipping provider you wish to remove and click its name to open it.
- Click the red ‘remove account’ button to remove the integration, then click ‘OK’.
- You will be returned to the list of shipping providers.
- Click ‘cancel’ if you decide to not delete the integration.
Update or verify channel integration
If Avasam is having issues printing labels correctly, your settings can be checked using the following steps:
- In ‘settings’, select ‘shipping integration’.
- Find the shipping integration you want to check and click its name to open it.
- Click the reauthorise button to open the window below.
- Check the values are correct then click ‘save’ to apply any updates or changes.
- You will then be returned to the list of shipping integrations.
- Click ‘Cancel’ if you decide to not change/update the integration.
Shipping services
To use Whistl with Avasam, you must also add the specific shipping services you wish to print labels for (such as next day or signed for delivery). As you will have already signed an agreement with Whistl, you will have selected the services you want to use and know how much each label will cost.
To specify particular shipping services:
- In ‘settings’, select ‘shipping integration’ and find Whistl.
- To open the integration, click the name.
- Click ‘shipping services’ to expand the list of available shipping services.
- Select an available shipping service and click ‘add’, before clicking 'save'.
- Click ‘cancel’ if you decide not to add the shipping service.
Deleting a shipping service
If you no longer want to use a shipping service, then it can be removed from Avasam.
To delete a shipping service:
- In ‘settings’, select ‘shipping integration’.
- Locate the shipping integration you want to check (such as Whistl).
- To open the integration, click its name.
- Click ‘shipping services’ to expand the list of available shipping services.
- Select the relevant shipping service and click the ‘x’ to the right of the service to delete it. Click ‘save’ to apply these changes.
- Click ‘Cancel’ if you decide not to delete the service.
Suppliers: Shipping integrations
Suppliers can use the features settings panel to make sure that all their details are correct and to optimise their Avasam workflows
This help article is written for our suppliers and may not be relevant if you are an Avasam seller. To access seller-specific articles, please follow this link.
Shipping integrations
Avasam integrates with a number of leading shipping and logistics companies, which means you can print labels directly as part of your dispatch process.
When you first start using Avasam, you will have to add shipping intergrations to your profile.
Once you have integrated one or more providers, then your screen will show necessary information for each provider, as seen below:
Add a new shipping provider
The add shipping provider button allows you to integrate a new provider or account to your Avasam profile. You may be able to have more than one account for some providers.
To add or integrate a new shipping provider:
- Click the add button for the relevant provider.
- Specify a name for the integration and click 'next' to proceed.
- Provide information about your company that matches the records of the shipping provider. This may vary by provider. Click 'next' to proceed.
- Fill in all necessary information for integrating with the shipping provider, as shown in the table below:
Field Description API key* Your provider will give you an API key value. Customer account number* Your provider will give you an account number. Weight Select a weight unit from the drop down list. Default weight If an item does not specify a weight, then enter a value which will be provided as a default weight when requesting a label. Dimension Select a unit of measurement from the drop down list for the dimensions. Default height If an item does not specify a height, then enter a value which will be provided as a default height when requesting a label. Default width If an item does not specify a width, then enter a value which will be provided as a default width when requesting a label. Default depth If an item does not specify a depth, then enter a value which will be provided as a default depth when requesting a label. - Click ‘next’ to continue with the setup. It will The return you to the shipping integrations screen with a new entry for the integration you just setup.
- Avasam can automatically submit your shipping manifests for you. If you do not select ‘yes’ you’ll need to submit them manually each day.
- You can return to the main page by clicking the settings link, or the cancel button.
- If using Linnworks, please ensure that both Avasam and Linnworks are using the same units of measurement.
- Fields marked with an asterisk (*) are compulsory and must be completed.
Updating a shipping integration
You can review and update the details of an existing shipping integration as required. To do this:
- Click the entry to open up a detailed view of the selected integration.
- If you want to adjust the details you entered for the shipping integration, click the edit link to review.
- If you make any changes (as indicated by 'unsaved changes' being visible) click the save button to apply them.
- If you are having problems with the connection to your shipping provider, click the reauthorise link.
- Click 'cancel' to discard changes at any point.
Add shipping service
To print labels, you must add one or more shipping services to the integration. To add a shipping service:
- Under the shipping services heading is a drop-down list of services available for this account. Select the relevant service from the list and click the add button.
- The service should now be shown in the list below the drop down field.
- The Shipping Service should have an ID and a name which will be shown to the sellers.
- You can set a minimum and maximum charge value.
- If these are set, then the service will only be shown for sellers to use if the product's price to them falls within the limits set. Otherwise, the item won't make that shipping service available.
- You can set '0' as a minimum value.
- If you want to hide the service from use by any sellers, then you can set the 'active' switch to 'no'.
- Click 'save' to apply any changes.
Remove shipping service
If you are no longer using a shipping service, you can remove it from Avasam.
- Check the list of currently integrated services and choose which service you want to be deleted from the list.
- Click the X button to remove the service and confirm deletion by clicking ‘OK’.
- The service should now be shown in the drop-down field.
Remove integration
You can remove a shipping integration from Avasam by following these steps:
- Choose the shipping integration that you want to remove.
- Click the remove account button.
- Confirm that you wish to delete it by clicking ‘OK’.
Suppliers: Customising predefined messages
Set messages to be sent to your customers at different stages of the selling process using these tools
This help article is written for our suppliers and may not be relevant if you are an Avasam seller. To access seller-specific articles, please follow this link.
When you take actions against orders from your sellers, Avasam will notify them with a message. Use these steps to customise this message to best reflect your business.
You can select which actions generate automatic messages to your sellers, as well as the content of those messages. Once a change has been made, it will apply to any actions taken afterwards.
You can set messages using the screen shown below:
The fields in the list contain the following information:
- Subject: the action you take which will cause the message to be sent.
- Message: the message is the text that the seller will see.
- If you do not specify a message for an event, one will not be sent.
Add message
If the message you want to review is not in the list, then you can add it by following these steps:
- Click ‘add message’.
- In the pop-up window, select the subject you want to write a message for from the drop-down list. Only subjects not already configured will be available.
- Enter the message to be sent.
- Click ‘add message’ to save.

- You can return to the main page at any time by clicking on the ‘Cancel’ button.
Deleting a message
To remove messages from the list.
- Find the message you want to remove and click on the ‘x’ button to the right of the message.
- Confirm that you want to delete it by clicking ‘OK’.
- You can cancel the deletion by clicking on the ‘Cancel’ button.
Editing a message
To edit an existing message:

- Find the relevant subject and click on the message box.
- Edit the text in the field.
- Click ‘save’ to apply your changes.
- You can undo the changes you make at any time by clicking on the ‘Cancel’ button.
Changes and updates
If you make any changes to the message settings, Avasam will display ‘unsaved changes’ in the bottom left-hand corner of the screen.
You can return to the main page at any time without updating the system by clicking on the ‘settings’ link in the top left or the ‘cancel’ button.
To save the changes you have made and apply them, click on ‘save’.
Suppliers: Updating order status in Avasam with imports
Save time and ensure consistency by updating your order status from CSV files
This help article is written for our suppliers and may not be relevant if you are an Avasam seller. To access seller-specific articles, please follow this link.
Avasam can import order update information when orders are processed outside the system from a CSV file.
This is a text file, but can also be opened and edited in a spreadsheet such as Excel. To import a file, you must first tell Avasam what information you want to import. This file can be uploaded by Avasam on a regular basis from an FTP server.
To create a new import configuration for a new import file type or source, you will need an example file to use:
- In Avasam, open the settings menu.
- Select 'imports'.
- Click on the 'add configuration' button.
- In the 'add import configuration' pop-up, select either 'file' or 'FTP' from the drop-down list labelled 'type'.
- 'File' means you have the CSV file on your local PC.
- 'FTP' allows Avasam to access the CSV file from a specific remote/web file server. You will be provided with access details by the Avasam team to manually or automatically add your files into this location.
- In the 'import type' list, select 'order status'.
- Click on the link marked 'download CSV template' to review the fields to be used or to populate a copy of the file.
- This contains the following fields:
- Order ID - Avasam order number.
- Status - Shipped in this column will mark the order as dispatched in Avasam.
- Shipping Carrier- The Avasam shipping provider used.
- Royal Mail
- DHL
- UPS
- DPD
- Hermes
- Parcel Force
- TNT
- FedEx
- Whistl
- UK Mail
- Yodel
- Aramex
- City Sprint
- Sky Net
- InPost
- Collect Plus
- DX
- Menzies
- Impact Express
- Tracking number - The tracking number provided by the shipping provider.
- This contains the following fields:
- When you have a CSV file ready to import, click on the upload button and locate the file in the browser window before clicking 'open'.
- Click the analyse and map button to review the data in the file for errors.
- A data preview will be loaded. If this shows the data in the file correctly, then move to the field mapping section below it.
- The left-hand column lists the column headings in the file you uploaded and the right-hand column shows which Avasam field they have been matched to. Avasam will automatically match fields if their name matches the name of the field exactly.
- To create a mapping:
- Select the name of the CSV heading in the CSV field drop-down.
- Select the Avasam field you want to map it to in the map to drop-down list.
- Click 'map field' to create the mapping.
- Both fields will be removed from the drop-downs and the list will be updated.
- If you want to remove a mapping:
- Locate the relevant line in the list of fields.
- Click on the 'x' to the right then confirm that you want to delete the mapping.
- Both fields will become available in the relevant drop-down lists.
- When you are satisfied that all fields have been mapped, click on the add configuration button before being returned to the 'imports' screen. It will now show your newly-added import configuration.
Once a configuration has been created and used once, it can be reused multiple times.
- In Avasam, open the settings menu.
- Select 'imports'.
- Locate the import configuration you want to use. It should show the status as 'ready to import'.
- Click on 'ready to import', then locate the relevant file to import and click on 'open'. The import's status will then be changed to 'import in queue'.
- While the file is being imported, you can check its progress by looking at the logs. To do this, click on the logs link.
- A list will then be shown that gives you the dates and times the import has been run. Click on 'view' to open the selected import log.
- When you have finished reviewing the logs, click 'cancel' to return to the list, then 'cancel' again to return to the main import configurations screen.
Suppliers: Inventory settings in Avasam
Use these settings to control and customise the information shown about your stock
This help article is written for our suppliers and may not be relevant if you are an Avasam seller. To access seller-specific articles, please follow this link.
To check the status of an option:
- Find the entry you want to check.
- If the arrow is pointing to the right, click on the entry title to toggle it open (arrow pointing down).
- If the entry is open, it can be closed again (indicated by the arrow pointing right) by clicking on the title.
Settings details
- Reject out of stock order
a. If active (toggled to 'yes'), then orders will not be imported from sellers where the stock level is 0 in Avasam at the time of receipt.
b. The seller will not be invoiced for their orders and will need to communicate with the customer as appropriate. - Stock threshold
a. The value in this field will tell Avasam which stock level to set as 0, or out of stock. This allows you to avoid accidental overselling where multiple sellers process orders for the same stock items. - Currency
a. Set the currency for your invoices. - Linnworks settings - These options will only show if your account is integrated with Linnworks.
- Download products from Linnworks - When integrated, Linnworks acts as your inventory source for product information and creation in Avasam. It automatically syncs periodically for stock levels and product details, but you can manually trigger a sync to move the update forwards.
- Sync inventory and prices - import new inventory items, and updates including price changes.
- Sync prices now - Sync only price changes for the products in your inventory.
- Order location in Linnworks -
- Inventory location in Linnworks -
- Download products from Linnworks - When integrated, Linnworks acts as your inventory source for product information and creation in Avasam. It automatically syncs periodically for stock levels and product details, but you can manually trigger a sync to move the update forwards.
Changes and updates
If you make any changes to these settings, Avasam will display the term ‘unsaved changes’ at the bottom left-hand corner of the screen.
Click ‘save’ to apply these changes.
You can return to the main page at any time without updating the system by clicking on the ‘settings’ link on the top left, or the ‘cancel’ button.
Suppliers: Setting up custom options for products
You can sell anything online, so custom mappings allow you to ensure you have the right information about your products in Avasam
This help article is written for our suppliers and may not be relevant if you are an Avasam seller. To access seller-specific articles, please follow this link.
Using custom mappings or attributes in Avasam allows you to provide additional information about the products in your inventory. Sellers can use this information to enhance their listings on marketplaces and websites, making them easier for customers to find in searches as well as more appealing.
There are only three fields per entry:
- Product Catalogue Attribute
- Select from a list of attributes already available in the Avasam catalogue to map this data to.
- Supplier Attribute Name:
a. This is the name of the attribute in the supplier's system, describing it. - Default Value:
a. If you want all items to possess this attribute, but don't want to pass it individually to each SKU, then the default value will be used where you haven’t specified an alternative that item.
- ‘Unsaved changes’ will be shown at the bottom left-hand corner of the screen when settings are edited.
- To save the changes you have made and applied them, click on ‘save’.
Adding a new mapping
You can add one or more custom options to the list by following these steps:
- Click ‘add new mapping’.
- In the new row, select the right option from the product catalogue attribute list.
- Click on the supplier attribute field and enter a name for the new option (Should match what is in your own system).
- Enter the default value, if appropriate.
- To add another options, repeat steps one to three.
- Click ‘save’ to apply the changes.
- Click ‘cancel’ to undo any changes.
Update mapping
To edit and update the name or default values for options at any time:
- In the custom options list, find the entry.
- Edit the contents of the chosen field by clicking inside it.
- Repeat for any other attributes you wish to edit.
- ‘Unsaved changes’ will be shown when changes are made. Click ‘save’ to apply changes.
- Click ‘cancel’ to undo any changes.
Suppliers: Using the support ticket system
All communication with your sellers must be via the Avasam support ticket system
The reason for specifying communication to be via the Avasam support ticket system is for your protection as an Avasam supplier partner. This ensures fairness should a dispute arise between you and a seller, as Avasam will have access to all relevant information about the matter should we need to intervene.
The support ticket system is accessible from anywhere in Avasam:
- In Avasam, click on the 'question mark' in the top right hand corner.
- Click on support tickets.
- In the list, click on the ticket you wish to review.
- Messages from the seller or support will be shown on the right. Responses by you will be on the left.
- Enter your response in the reply box, and click post reply to send.
- You can attach pictures or other supporting files using the upload button.
- If no further response is required, click close ticket to complete the discussion.
When a new ticket is raised for your attention, or the other party replies to you in a ticket, you should get an email notification. The notification bell icon in the top right hand corner will also notify you of updates by superimposing a number on it.
Click on the bell for a list of updates, and click on the entry to be taken to the message(s).
New support tickets or responses must be answered within 1 working day (24 hours). The ticket will have a timestamp on it, showing the last time it was dealt with by the other party.
If the ticket is about an order from a seller, you can click on the order ID and it will open the order in a separate tab to review.
Raising a support ticket about Avasam
If you have an issue with Avasam out of hours, or of a technical nature, you should raise a support ticket, and the Avasam team will look into it for you.
- Click on the 'question mark' in the top right hand corner of your screen.
- Click on support tickets.
- Click on add ticket.
- Under what can we help you with?, select the area of Avasam you have a question about, or where you're experiencing an issue.
- Briefly summarise the problem in the ticket reason field. This will be the ticket title.
- Put the rest of the information about the issue in the ticket description. Give the team as much information as possible.
- If you have screenshots, recordings, sample files or anything else that would be of help in reproducing the issue or investigating it, use the upload button to attach the file(s).
- Click add ticket to submit it for investigation.
Try to add as much information as possible, as this will reduce the number of questions the support team has to ask, and make it faster for them to resolve your issue or suggest an alternative.
Fast and accurate responses to tickets will improve the relationship between you and your sellers, and encourage confidence in them to source more products from you. This means that the leading sellers will improve your sales as their own performance increases, and they will be more likely to look out for and source new lines.
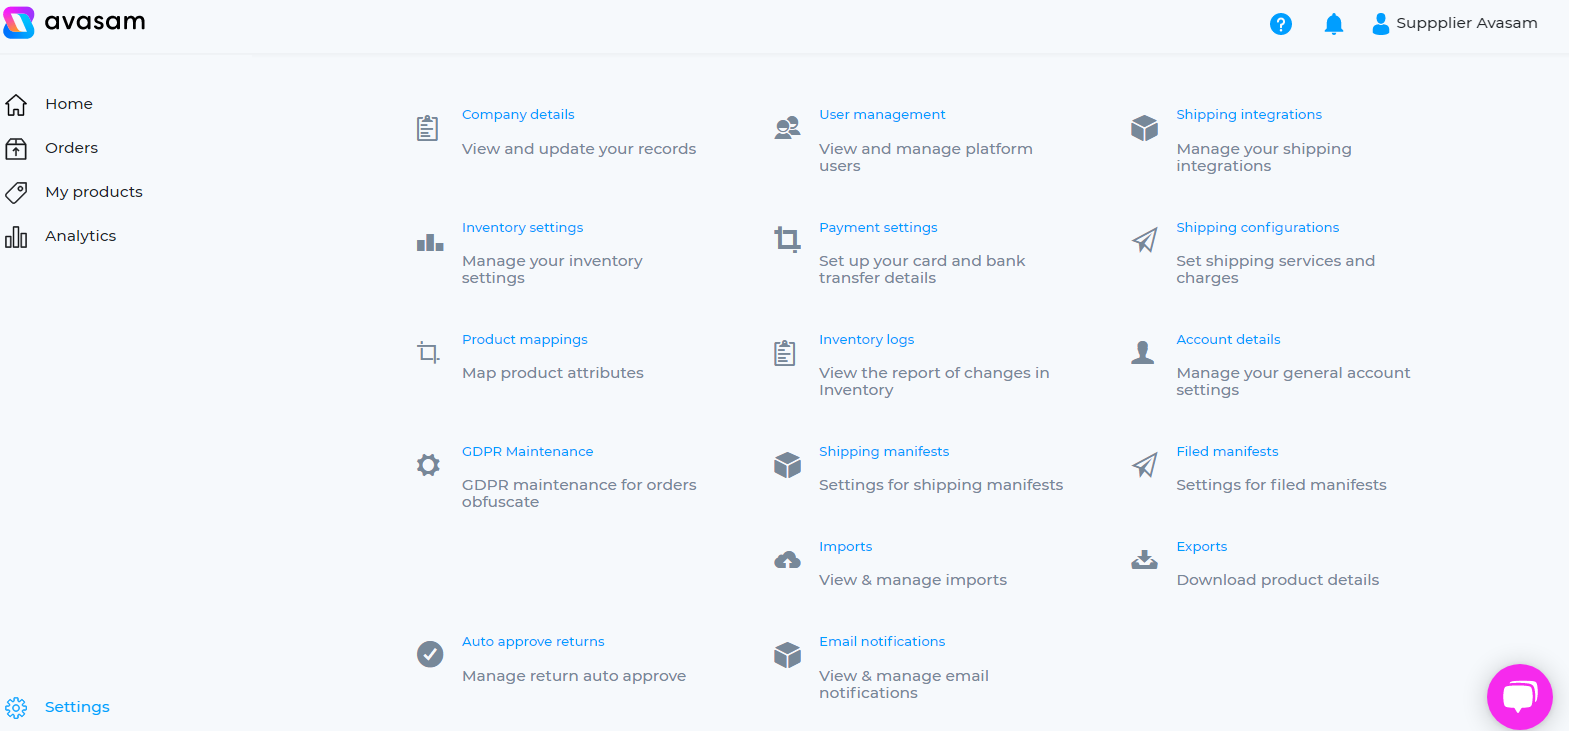
Suppliers: Settings overview (details and users)
Suppliers can use the features settings panel to make sure that all their details are correct and that team members can access the platform
This help article is written for our suppliers and may not be relevant if you are an Avasam seller. To access seller-specific articles, please follow this link.
Company and contact details
Please make sure all your contact details are correct, as we need them to process your information and to get in contact if necessary. Fields marked with an asterisk (*) are compulsory and must be completed.
Account details
It is crucial that your Avasam account details are filled-in correctly and match those on your wider business records.
The most important information to review here is your contact details, for invoicing and communication purposes, and the returns address, as this would be passed to sellers when you approve a return to be sent.
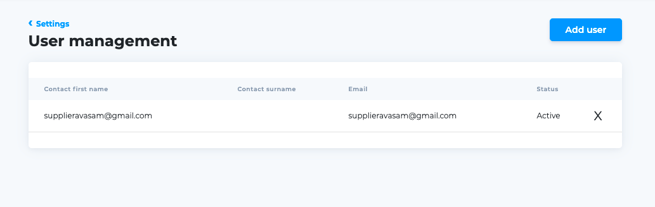
User management
You can have multiple users in your company authorised to use Avasam in their own name, with different access rights. Individual users require the following fields to be completed:
- User name
- Email address
- Status (active/inactive)
- Password
Add user
The add user button lets you create a new user account for a member of your team to use Avasam. Each member of your team must have a separate account. To do this:
- Click add user to create a new user, then fill in all fields as prompted.
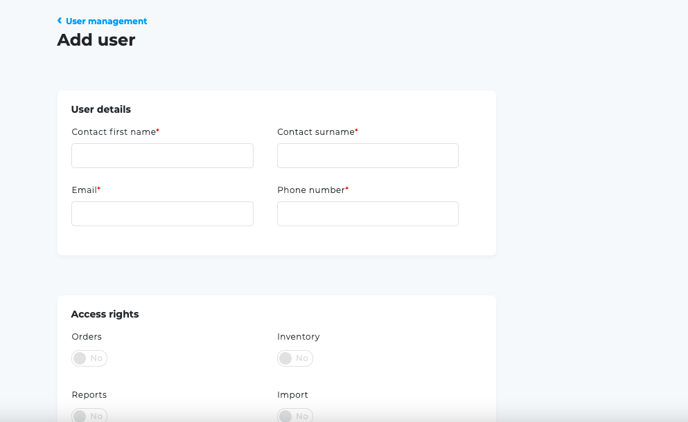
- Set access rights for the new user, depending on which areas of the platform you want them to have access to. All of these options default to ‘off’.
- Click ‘save' to create the account using the options you have selected. The new user will receive an email prompt from Avasam to login and set their password via the email address specified.
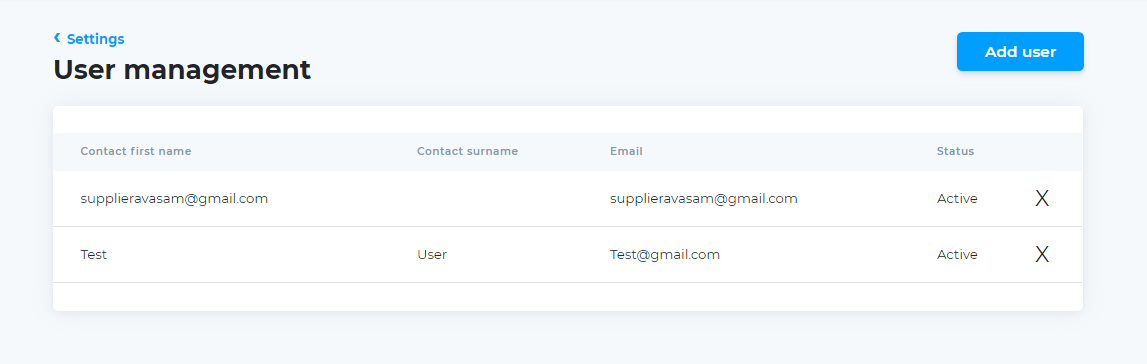
Delete user
User accounts can be deleted, permanently revoking their access to Avasam.
To delete a user:
- Locate the user you want to delete in the list and click the ‘x’ to the right of the user’s entry.
- Confirm that you want to delete the profile by clicking ‘OK’. You will then be returned to the list of users
Update user details
The details of an account can be edited if you as a user have the correct access rights.
To update user details:
- Locate the user in the list and click on their user name to open the edit window.
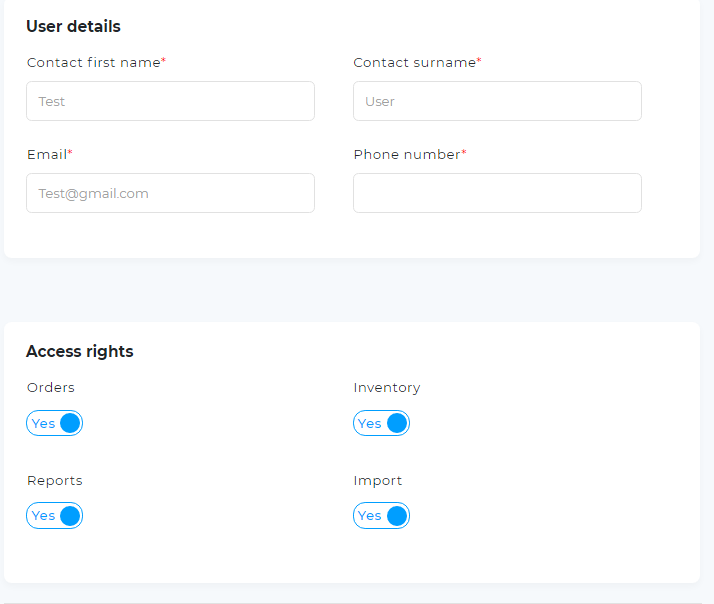
- Make any adjustments you wish to make. The record will show ‘unsaved changes’ if you change anything so if you want to keep the amended details click 'save'.
- You will then return to the user list.
Deactivate user
You can mark a user’s account as inactive to temporarily revoke their access to Avasam without permanently deleting any of their details.
To deactivate a user:
- Locate the user in the list.
- Click on the user name to open the edit window.
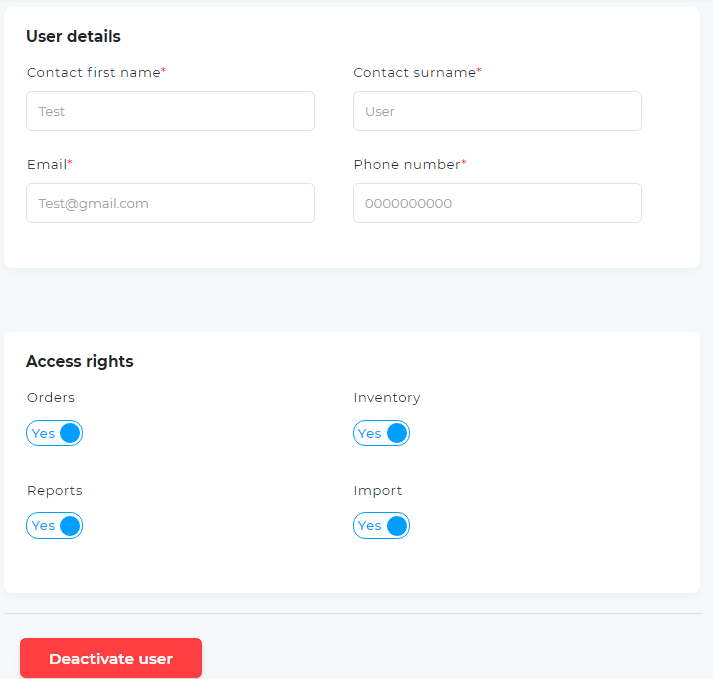

- You can then click the deactivate user button before returning to the user list.
Activate user
An account marked as inactive has temporarily had their access to Avasam revoked.
To re-activate a user:
- Locate the user in the list then click on the user name to open the edit window.
- Click the reactivate user button to change the user’s status before returning to the user list.
Shipping integrations
If processing your orders and dispatching them from within Avasam, you can integrate your preferred shipping providers and their servicers here, to allow you to print shipping labels. You can add multiple providers simultaneously, each with more than one service.
Inventory settings
Your primary concerns in this section are reject out of stock order, wherein you can decide if the system should reject orders that come in after your stock updates and isn't sufficient.
If you are producing your own products, you may choose to turn this off should you think you can still dispatch within the agreed timeframe.
Payment settings
In the payment settings section, you can update your bank details should they change, ensuring that your disbursement reaches you correctly.
Shipping configurations
When you have added your supported shipping services, you can specify here which ones are mapped to the supported 3 Avasam shipping options, and their cost.
- Locate the shipping service you want to use.
- Set the Avasam vendor option (The provider, eg Whistl) from the dropdown list.
- Set which if the shipping services it will be associated with. Ensure that the service you are using is compliant with the time on the Avasam service.
- Standard tracked (2-4 days)
- Expedited tracked (1-2 days)
- Standard (3-5 days)
- Specify the cost (inc VAT) for this service to the seller if it will ahve a fixed cost.
- Specify the VAT rate for this shipping service (usually 20%).
- Specify from the dropdown the number of days this service is expected to take to deliver the item.
- If this is a tracked service, toggle tracked to yes.
- If this service will be priced based on weight, toggle weight to yes.
- If this service will be priced based on the overall order value, toggle ordertotal to yes.
- While several shipping services can be matched to an Avasam shipping service, only one can be active for each of the three. That will be toggled to yes under active.
Weight and order total based shipping pricing
Avasam supports pricing for shipping based on the weight or value of the items being shipped. This can be enabled for one or more of the shipping services, instead of fixed cost shipping. More information on using this is available here.
Account details
Account details contains information about the currently logged in account. It also allows you to change your password.
Changing your password
- In account details, click on change password.
- Enter your old pasword.
- Enter the new password.
- Re-enter the new password to confirm it
- Click save to apply the change.
GDPR maintenance
If you receive a request to delete personally identifiable information about an EU resident, you can use this section to search for and obfuscate/remove it from Avasam.
Shipping Manifests
If you're printing shipping labels within Avasam, then this section will list the labels you have printed for different services today.
Filed Manifests
If you're printing shipping labels within Avasam, then this section will list the labels you have printed for different services by day previously.
Imports
Avasam allows you to import information into the database in bulk, using CSV (text) files. You can import products, variation products, orders, and order status updates.
Exports
Avasam lets you export order information in bulk, as a CSV file.
Auto approve returns
Should you choose, rather than have to review and approve return requests, you can let Avasam approve and action them automatically by enabling this control. It defaults to off, with the toggle set to no.
Suppliers: Deleting information for GDPR requests
GDPR compliance is essential, but Avasam lets you easily delete customer's information without deleting the orders when necessary
This help article is written for our suppliers and may not be relevant if you are an Avasam seller. To access seller-specific articles, please follow this link.
You can easily find out if you hold a customer's information using their name or email address to search Avasam - and then delete it - by following these steps:

- In Avasam, open the settings menu and select the GDPR maintenance option.
- You can then search this option to check if you hold information on a particular person. Using more information to set up a more detailed search will make it easier to be sure you've identified the right person.
- You can create a search using a name and/or an email address, and use a telephone number or postcode.
- Click 'view' to search. If no results show up, then they may not have ordered from you or may have previously asked to be removed.
- Any matching records will be shown, allowing you to check any that you want to be deleted/obfuscated. All other order details will remain (such as items and values) but all personal information will be replaced by random characters.
- Click 'obfuscate' to clear the personally identifiable information (PII) from the selected orders, then repeat for any other people that have made requests.