Amazon
Amazon channel integration
Integrating Amazon with Avasam allows you to download orders, control prices and stock levels
Avasam can be integrated with one or more Amazon accounts. This lets you download orders and update listings with stock levels.
The list of sales channel integrations has 4 columns:
- The brand logo of a channel
- The company name of a channel
- The name of the specific channel integration
- The status of the integration (a blue yes means that it is enabled, a grey no means it is disabled)
Creating a new Amazon integration
To create a new sales channel integration:
- Open settings’ and select sales channel integration’.
- Click the add sales channel button.
- Click on the add button next to Amazon and click next to continue.
- Enter a name for the integration, for later reference.
- Select the Amazon site you want to connect to (eg United Kingdom) from the dropdown list.
- Click next.
- Authorise your connection with Amazon using the authkey button.
- A new tab will open. Tick the box labelled "I direct Amazon to provide Avasam access to my Selling Partner account and related data" after reading the information provided.
- Click confirm.
- Close the tab when directed to.
- You will be returned to the sales channel list in Avasam, with a new row added for your new integration.
Ensure that your channel has stock updates enabled to ensure that your listings don't oversell.
- Click on the channel name.
- Click on additional settings.
- Toggle the switch for stock update to yes.
- Click save.
Disabling an Amazon integration
When you create a new channel integration, it is automatically enabled and active.
To temporarily disable the integration and stop it downloading orders and updating listings:
- Open ‘settings’ and select ‘sales channel integration’.
- Choose which integrated sales channel you want to disable and toggle the status switch from ‘yes’ to 'no'. The channel will then be disabled.
Enabling an Amazon integration
To allow an integration to resume downloading orders and updating listings:
- Open ‘settings’ and select 'sales channel integration'.
- Choose which integrated sales channel you want to enable and toggle the status switch from ‘no’ to 'yes'. The channel will then be re-enabled.
Removing an Amazon integration
If you no longer wish to have Avasam connected to an Amazon channel, it can be easily removed. Once deleted, you will need to re-create the integration from scratch should you choose to re-use it.
To remove the integration:
- Open ‘settings’ and select ‘sales channel integration’.
- Find the integrated sales channel you want to remove and click its name to open the integration.
- Click the red ‘remove account’ button and click ‘OK’ to confirm.
- You will be returned to the list of channel integrations.
- If you delete an integration and then reintegrate the same channel, the analytics and reports will not recognise orders from the two integrations as being from the same site.
Updating or verifying Amazon integrations
If Avasam is having issues downloading from a sales channel, the causes of this can be easily checked. In ‘settings’, select ‘sales channel integration’ to ensure that you are connecting to the correct website end point.
To update or verify a channel integration:
- Find the relevant channel integration and click its name to open the integration.
- Click ‘reauthorise’.
- Check that the seller ID is correct and the correct site is selected.
- Check the ‘auth key’ is correct.
- Click ‘save’ to apply any updates or changes to Avasam.
- You will be returned to the list of channel integrations.
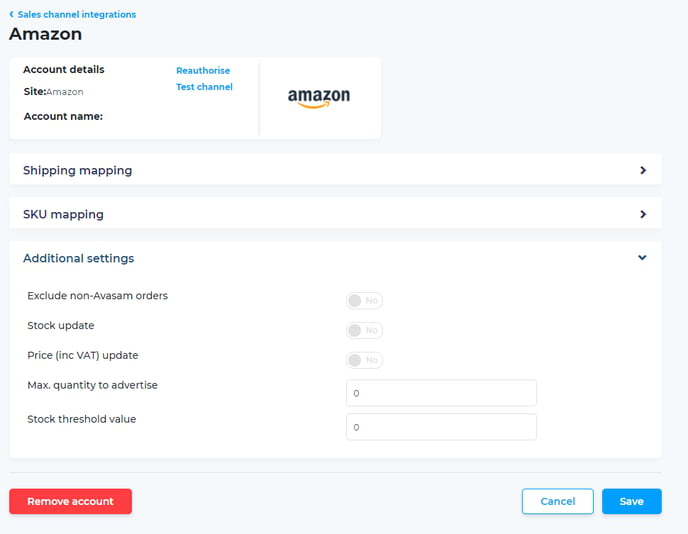
Updating settings for stock updates in your integration
When Avasam receives a notification that available stock levels have changed from the supplier, it updates the relevant mapped listings on the sales channel.
In a small number of cases, it is possible that popular items may oversell.. To avoid this, you can make adjustments to the stock levels Avasam sends to the channel for products to reduce the concern about cancelling and refunding orders.
Avasam lets you set a 'stock threshold value', meaning that when the stock level reaches that level, it sends '0' to the listing(s) affected, to prevent excess orders affecting your account.
Avasam also supports the 'max quantity to advertise' feature provided. This means you can control how many units of stock the channel will see per listing to avoid looking overstocked.
To do this:
- In ‘settings’, select ‘sales channel integration’.
- Find the relevant channel integration and click its name to open the integration.
- Scroll down to the 'additional settings' section heading.
- Click on the 'additional settings' section heading to open up the settings menu.
- Update the value for 'max quantity to advertise', if required. The default value is '0', meaning it's inactive.
- Update the 'stock threshold value' if required. This defaults to '5' for your protection.
- Click ‘save’ to apply any updates or changes to Avasam.
- You will be returned to the list of channel integrations.
- Click ‘cancel’ if you decide to not change/update the integration.
Excluding non-Avasam orders
Avasam can download orders for products not linked in Avasam - This is useful if you don't immediately map listings after creating them. Alternatively, if you sell some of your own stock alongside Avasam orders, it can clutter up the order screen. Non-Avasam orders are deleted after 3 days if not for mapped products.
To avoid seeing those orders:
- In ‘settings’, select ‘sales channel integration’.
- Find the relevant channel integration and click its name to open the integration.
- Scroll down to the 'additional settings' section heading.
- Click on the 'additional settings' section heading to open up the settings menu.
- Set the exclude non-Avasam orders switch to off, or grey.
- Click ‘save’ to apply any updates or changes to Avasam.
- You will be returned to the list of channel integrations.
You cannot make exclude non-Avasam orders and split orders with unknown SKUs active simultaneously, only one at a time can be active, or neither.
Splitting order containing Avasam and non-Avasam SKUs
Where some of your orders contain a mix of Avasam and non-Avasam products, this setting allows you to process the Avasam products and not import the unknown items. When set to no, you will only import these orders if exclude non-Avasam orders is set to no.
To enable this:
- In ‘settings’, select ‘sales channel integration’.
- Find the relevant channel integration and click its name to open the integration.
- Scroll down to the 'additional settings' section heading.
- Click on the 'additional settings' section heading to open up the settings menu.
- Set the split orders with unknown SKUs switch to on, or green.
- Click ‘save’ to apply any updates or changes to Avasam.
- You will be returned to the list of channel integrations.
Repricing software
Please remember that, if using automatic repricing software on listings generated by or controlled by Avasam, they will override any rules or updates made within our sotware. As such, we cannot be held responsible if margins are not covered by the sale price in an order where this software is used, so ensure you check your products and the repricing software regularly.
Listing products on Amazon
DropShip products through your Amazon account by following these steps
At present, Avasam does not have an inbuilt listings tool. To list your products on Amazon, you will need to export information about the products from Avasam, and then create a marketplace listing using this information.
After you have imported the relevant files successfully, you can link listings to the correct Avasam products and map shipping services to the relevant shipping service details in Avasam.
If products and shipping services are not correctly mapped, then corresponding invoices cannot be raised and orders can't be passed to the supplier for dispatch to the customer.
Any products that we do not believe are suitable for selling on Amazon will be flagged accordingly in both the product description page and the catalogue search results using red text.
We are flagging such products in order to protect our sellers from listing products on Amazon where we believe there is a risk of rival sellers or brand owners reporting you for intellectual property rights infringements and where the supplier is not the brand owner/manufacturer, or where we may not be able to provide documentation required to evidence the supply chain back to the brand owner/manufacturer.
For more background reading on this, you can refer to our blog
Exporting product information
You should start by exporting the basic product details file. This contains all the information you need to create a listing.
Creating a listing on Amazon
The information exported from Avasam can be used to create listings for products on Amazon through your Seller Central account.
Firstly, check whether or not the item is already on Amazon. You can do this by searching for the barcode (Also known as the UPC or EAN number).
If the item does exist, then you can create a file to add your prices and a quantity to it (and any others which already exist) and remove them from the main file. Avasam will then take over by updating available quantities when you link the listing later.
When creating your inventory file for the price update, or for the listing creation, use the pre-existing Avasam SKU to make mapping much easier.
You can download the file template from this link - to use it, you need to login to your Seller Central account on Amazon. Each template file is a spreadsheet that contains tabs for the following fields:
- Instructions
- Definitions of the fields (including acceptable values for fields that only accept certain terms)
- Example template headings with a sample row
- Examples of acceptable formatting
Use the information from the Avasam export to build an inventory file by copying and pasting information from the appropriate columns.
We would always advise creating and testing an inventory file for a couple of products first to ensure you’re happy with the result.
Mapping products and shipping services
Once your listing has been created, you need to link it to Avasam products. You might need to wait a short while for the selling channel to update before clicking ‘download’ for the new listing details.
If you used the same SKUs as Avasam, then ‘automap’ will take care of the actual linking. Otherwise, you will need to map the listings to products one at a time.
You also need to link any shipping services that you haven't previously mapped. This will also allow orders to be downloaded and invoiced.
Avasam cannot invoice an order if it doesn’t know what the cost of the products and shipping services are. If it can’t invoice them, you can’t pay for them, and they won’t be sent to the supplier for dispatch. In addition, stock levels and prices won’t be updated by Avasam automatically.
Don't forget to make sure your payment method is setup, because the invoice cannot be paid without an active and correct payment method installed.
Repricing software
Please remember that, if using automatic repricing software on listings generated by or controlled by Avasam, they will override any rules or updates made within our sotware. As such, we cannot be held responsible if margins are not covered by the sale price in an order where this software is used, so ensure you check your products and the repricing software regularly.
Amazon SKU mapping
This guide ensures that Avasam can fulfil and invoice your Amazon orders with the correct items.
SKU mapping makes sure that Avasam knows which items in a particular order correlates with items in your inventory.
If the product isn't mapped, Avasam can't direct the order to the right supplier and raise the correct invoice. This means that your order won't be shipped
If you want Avasam to automatically recognise the correct inventory SKU when the order is downloaded, then you will need to ensure all SKUS are mapped correctly from Amazon.
Editing existing SKU mappings
The SKU mapping tool will list all existing mappings. You can expand this section by clicking on the arrow to the right of the title. This will open a new window that includes information about the products in your inventory, and the listings available on the integrated account.
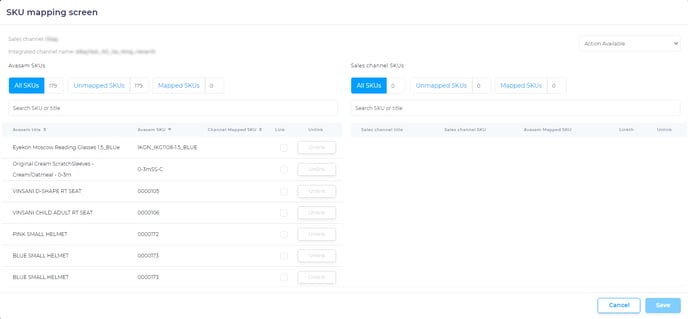
Create a new SKU mapping
To create a new SKU mapping:
- You can search for the listing you want to map by entering all or part of the SKU or title into the search bar under sales channel SKUs.
- Select 'download' from the actions available field to grab the latest information from the site if the listing is not shown.
- Search for the SKU you want to map under the sales channel SKU heading, or by scrolling down the list.
- Search for the Avasam SKU to map this against under the Avasam SKU heading, then select the SKU and click ‘map them’ to the right of it.
- Click 'save' to apply this mapping to Avasam.
To further filter the listings and products shown in either list, use the unmapped SKUs and mapped SKUs options. This will reduce the volume of results shown
Changes made will only affect orders downloaded after new mapping is in place. It will not affect orders already in Avasam.
Delete a SKU mapping
To delete a SKU mapping:
- You can search for the listing you want to change by entering all or part of the SKU or title into the search bar under Avasam SKUs or sales channel SKUs.
- Click the unlink button to sever the mapping.
- Click 'save' to apply this change of mapping to Avasam.
Amazon shipping mapping
This guide ensures that Avasam can fulfil and invoice your Amazon orders with the correct shipping services
Shipping mapping makes sure that Avasam knows which shipping service and provider to use when sending an order.
In this process, the shipping service chosen by the customer when ordering online is mapped to a shipping service provided by the relevant supplier. The seller may offer free shipping, but the supplier will often charge for shipping resulting in the seller bundling the cost into the stock price.
If the shipping service isn't mapped, Avasam can't raise the correct invoice. as it doesn't know who to charge. This means that your order won't be shipped
Because of this, you need the shipping service selected by the customer to be transferred to Avasam when the order is downloaded, through shipping mapping.
Existing shipping mappings
The shipping mapping section will list all existing mappings. This will open a new window that includes information about the available Avasam shipping services, and the services available on the integrated account.
Creating a new shipping mapping
To create a new shipping mapping:
- Select the service you want to map under the sales channel shipping service drop-down list.
- Select the Avasam shipping service to map this against under the Avasam shipping service drop-down list, then click ‘map field’.
- Click 'save' to apply this mapping to Avasam.
- This will only affect orders downloaded after the new shipping mapping has been put in place. It will not affect orders already in Avasam.
Deleting a shipping mapping
To delete a shipping mapping:
- Locate the service mapping you want to delete.
- Click the ‘x’ to the right of the service.
- Click ‘save’ to apply the change.